


Calcaneal articular fractures are fractures classically associated with a high rate of complications and poor outcomes. Osteosynthesis of the calcaneus through a sinus tarsi approach has shown results equal to or superior to those of the extended approach, having become the new gold standard.
The objective of this article is to detail step by step the surgical technique of osteosynthesis of intra-articular fractures of the calcaneus through a sinus tarsi approach, from the selection of the fracture, positioning of the patient, layout of the operating room and the fluoroscope, the entire surgical process until postoperative treatment.
The surgical technique described below is described in 6 steps.
- 1.
Layout of the operating room. Patient and fluoroscope positioning.
- 2.
Reduction of the posterior tuberosity (correct height and varus).
- 3.
Sinus tarsi approach.
- 4.
Reduction of the articular surface and correct visualisation. Arthroscopy.
- 5.
Fixation of the articular surface.
- 6.
Fixation of the posterior tuberosity.
Anatomical reduction of complex calcaneal fractures through an sinus tarsi approach requires an understanding of the fracture and its associated deformities. Following the described sequence step by step will help to achieve a better reduction in order to achieve better functional results.
Las fracturas articulares del calcáneo son fracturas clásicamente asociadas a una alta tasa de complicaciones y malos resultados. La osteosíntesis del calcáneo a través de un abordaje del seno del tarso (STA) ha mostrado unos resultados iguales o superiores a los del abordaje ampliado, habiéndose convertido en el nuevo patrón oro.
El objetivo de este artículo es detallar paso por paso y razonadamente la técnica quirúrgica de la osteosíntesis de las fracturas intraarticulares de calcáneo a través de un STA, desde la selección de la fractura, la colocación del paciente, la disposición del quirófano y del fluoroscopio, todo el proceso quirúrgico, hasta el tratamiento postoperatorio.
La técnica quirúrgica descrita a continuación se describe en 6 pasos:
- 1.
Disposición del quirófano. Colocación del paciente y del fluoroscopio.
- 2.
Reducción de la tuberosidad posterior (corregir altura y varo).
- 3.
STA.
- 4.
Reducción de la superficie articular y su correcta visualización. Artroscopia.
- 5.
Fijación de la superficie articular.
- 6.
Fijación de la tuberosidad posterior.
La reducción anatómica de fracturas complejas de calcáneo a través de un STA requiere comprender la fractura y sus deformidades asociadas. Seguir paso a paso la secuencia descrita ayudará a conseguir una mejor reducción con el fin de lograr mejores resultados funcionales.
Calcaneal joint fractures are fractures classically associated with high rates of complications and poor outcomes.1–3 These are due to both degenerative arthropathy of the subtalar joint and associated deformities. Thus, residual varus will affect gait, lateral wall shortening and/or fracture can lead to peroneal tendon impingement, and loss of Böhler's angle results in dorsal flexion of the talus and consequent anterior tibio-talar impingement, with anterior ankle pain.
The aim of treatment is, therefore, a joint reduction with a step-off of less than 2mm, to restore height by restoring Böhler's angle and correct alignment, and to minimise the risk of soft tissue complications.
For decades, the extensile lateral approach has been considered the gold standard in the surgical management of these fractures, allowing complete exposure and ease of plate osteosynthesis. In order to minimise soft tissue complications and preserve vascularisation, there has been increasing interest in achieving the same goals through minimally invasive osteosynthesis.4 These techniques include the sinus tarsi approach (STA), the use of arthroscopy, percutaneous screw osteosynthesis, or the use of dedicated plates for minimally invasive surgery. Of these, osteosynthesis through the STA has become the approach of choice for these fractures, achieving results equal to or better than those of the extensile lateral approach, with fewer soft tissue complications.5–10
However, the number of articles detailing this surgical technique step-by-step is limited. The aim of this article, based on the current literature and the authors’ experience, is to describe the surgical technique for osteosynthesis of intra-articular calcaneal fractures via the STA in a step-by-step and well-reasoned manner, from fracture selection, patient positioning, operating theatre and fluoroscope layout, through the entire surgical procedure to postoperative management.
Indications and contraindications. Patient selectionIndications for treatment depend on the fracture pattern and the degree of fragment displacement, as well as the patient's characteristics and preferences.
While patients of advanced age, with a low functional level, smokers, diabetics, or with vascular insufficiency are not good candidates for conventional surgery, minimally invasive approaches, with a lower risk of soft tissue complications, allow the range of surgical candidates to be widened.11–13
It is also important to discuss expectations of surgery with the patient, as these fractures are likely to have sequelae even after surgical treatment.14–17 We must warn the patient of the likely risk of subtalar stiffness, difficulty walking on uneven terrain, widening of the heel which may lead to changes in footwear, and/or residual osteoarthritis which may require subtalar arthrodesis.
However, although sequelae are possible, appropriate surgical treatment with open reduction and internal fixation has been associated with better outcomes than non-surgical treatment, regardless of fracture line or patient characteristics,18–21 as well as lower rates of post-traumatic osteoarthritis and the need for secondary subtalar fusion.22 In cases where the patient ultimately requires arthrodesis, restoration of the anatomy (varus hindfoot, calcaneal height, or lateral wall widening, and peroneal impingement) after reduction and internal fixation involves less complex salvage surgery, with better clinical outcomes than in those managed conservatively.23
Benefits and risks of the sinus tarsi approachWhile the advantages of the STA over the extensile lateral approach are clear in terms of reduced risk of complications and infection rates, as well as shorter operating and recovery time,4,24,25 it is important to understand that the choice of a limited approach such as the STA should not dictate the final outcome.
Achieving a correct functional result depends on correcting the series of deformities associated with the fracture that lead to a worse functional result, a higher probability of salvage surgery, and a worse outcome of the latter: varus and shortening of the posterior tuberosity, fracture, and displacement of the posterior facet, lateral wall fracture, loss of height, and widening of the calcaneus.19
Therefore, associated with the soft tissue benefits, the main drawback of the STA is that it provides only moderate visualisation of the subtalar joint, which may be challenging for surgeons with limited experience in complex intra-articular calcaneal fractures, and may result in poorer joint reduction and radiological and functional results.18,26
Another fundamental factor when using this approach is the time from fracture to surgery, as one of the key points for successful reduction is the mobility of the fragments and the ability to use ligamentotaxis to indirectly reduce the fracture. Therefore, surgery should preferably be scheduled within the first 7 days after the trauma, as opposed to treatment using an extensile approach, and surgery within the first 3 days has even been described without an increase in complications.27,28 The condition of the soft tissue secondary to the initial trauma will therefore influence the decision whether to approach the fracture in the first week via the STA or to delay surgery. Two weeks after the fracture, reduction of the fragments through this approach is very difficult and may compromise the outcome, making it necessary to consider an extensile lateral approach.
Finally, and also importantly, it should be noted that the decision to use the STA or an extensile approach must be carefully planned and made in the knowledge that, unlike other minimally invasive procedures, it is not possible to change the intraoperative plan as it is not feasible to extend the incision or to combine the two incisions. Understanding and selecting the fracture is of paramount importance and we will rely on its classification for this.
Classification of calcaneal fracturesThe classic 1952 Essex-Lopresti classification29 divided these fractures into 2 types: a first type, the “tongue”, which is a product of vertical compression and presents a horizontal fracture line that runs posteriorly, creating a posterior–superior fragment, and a second type, the “articular depression”, which is a single vertical fracture line that separates the anterior and posterior portions of the calcaneus.
Sanders et al.,30 in 1993, later presented what has been the most widely used classification for many years because of its usefulness for planning and prognostic value.1,31 Based on computed tomography scans, it classifies these injuries according to the degree of comminution and the position of the fracture line on the articular facet of the calcaneus.
In 2018, the AO proposed their classification,32 which is more complete as it combines the two previous classifications and is preferred by the authors as it allows the selection of the appropriate surgical technique and indication for the STA or extensile lateral approach. According to this classification, we understand that achieving a correct reduction of the articular surface via the STA becomes more difficult as we progress (Fig. 1). Following this classification, we believe it is the procedure of choice for the simplest fractures, the AO 82B (tongue-type) and the AO 82C1 (Sanders 2). In the case of AO 82C2 (Sanders 3), surgeon experience and good selection and planning are required, with those with more lateral than medial lines being simpler. In 82C3 (Sanders 4), osteosynthesis through the STA is not indicated, but primary arthrodesis through this approach is (Fig. 1).

The surgeon new to this type of minimally invasive procedure should start with the simplest fractures, ideally AO 82B and AO 82C1 fractures. It is essential to have a good radiological study with computed tomography, to ask the radiologist for good triplanar reconstructions to understand the fracture line, and to plan correctly.
Surgical techniqueThe surgical technique described below is based on careful preoperative planning, understanding and selecting the fracture, and understanding why, how, and in what order to perform the necessary steps to reduce the varus, restore height, reduce the articular surface, and restore Böhler's angle. To do this we will follow 6 steps:
- 1.
Layout of the operating theatre. Patient and fluoroscope positioning.
- 2.
Reduction of the posterior tuberosity (correct height and varus).
- 3.
STA.
- 4.
Reduction of articular surface and correct visualisation. Arthroscopy.
- 5.
Fixation of the articular surface.
- 6.
Fixation of the posterior tuberosity.
In this operation, the positioning of the patient and the operating theatre staff, the fluoroscope and the arthroscope are essential to obtain good radiological projections for comfortable of control the reduction and osteosynthesis of the fracture.
The operation is performed under spinal anaesthesia and/or local anaesthesia, with the patient in lateral decubitus on the healthy side on a radiolucent table. The healthy limb is placed anteriorly and the limb to be operated on is placed posteriorly on the edge of the table, on a radiolucent board or sheet. The surgery is performed under ischaemia by exsanguinating the limb with an Esmarch bandage (Fig. 2).

Three basic projections are required for this procedure: lateral, lateral oblique or Broden's view, and axial or Harris projection. The fluoroscope is positioned 30–40° from the operating table, posterior to the patient and entering from the patient's head. From this position it will not interfere with the operation. Entering from this position provides a pure lateral projection. To visualise the posterior facet and the subtalar joint, we use Broden's view, obtained by external rotation of the leg between 30° and 45°. Finally, to obtain a pure axial image we simply tilt the fluoroscope 90°.
With this configuration, with a single movement of the fluoroscope, we obtain the 3 projections essential for surgery (Fig. 3).
Step 2. Reduction of the posterior tuberosity. Application of an external fixator or distractor
This step, which is sometimes forgotten or not mentioned in some techniques, is essential to achieve reduction of hindfoot varus and then of the articular surface in a later step.
As shown in Fig. 4, the compression force produces a proximal varus displacement of the posterior tuberosity.

This varus deformity must be reduced by applying traction and valgus. Applying transcalcaneal traction, a posteriorly inserted Steinmann pin, or a lateral or medially inserted external fixator/distractor has been described for this purpose.
Transcalcaneal traction is probably not the best option for managing the foot throughout the procedure because of its discomfort and the need for a person to apply the traction, A Steinmann pin inserted from the posterior side does not always provide sufficient force to correct varus, as it is a unicortical device inserted into fractured cancellous bone, but more importantly it does not provide the traction necessary to give length to the posterior tuberosity, and therefore we do not recommend this method.
We believe the ideal system is a distractor, but as this is not available in all centres, it can be replaced by an external fixator, and can be placed on either the lateral or medial aspect of the foot. In our experience, it is more comfortable and effective to place an external fixator from the medial side, as it does not interfere with the rest of the surgery and allows us to correct the varus of the posterior tuberosity better.
The function of the external fixator is both to correct the varus of the posterior tuberosity and, when applying traction, to remove the tuberosity that is interposed between the articular fragments, preventing reduction of the articular surface of the posterior facet of the calcaneus a posterior step (Fig. 5).

Understanding this concept is critical, because if we fail to remove the tuberosity, it will not be possible to reduce the articular fragment, as the tuberosity is physically interposed between the two fragments. This may be one of the reasons why a satisfactory joint reduction is not achieved (Fig. 6).

There are several aspects to consider when inserting the pins (Fig. 7):
- •
The more proximal pin may be inserted into the talar neck or into the distal tibia, at the surgeon's discretion.
- •
The calcaneal pin should be inserted perpendicular to the tuberosity. To do this, we move our hand slightly towards the patient's head to insert the pin perpendicular to the calcaneal tuberosity in varus. Both pins remain in a divergent position.
- •
The calcaneal pin should be placed bicortically, as a pin inserted into the cancellous bone of the fractured bone is likely to loosen within the bone and not exert sufficient force to correct the deformity.
- •
The pins should ideally be at least 5mm in diameter, otherwise they have a tendency to bend and lose tensile strength.

As the posterior tuberosity is reduced, the pins move from a divergent to a convergent position. Hindfoot length and varus correction are checked both radiographically and clinically (Fig. 8, Table 1).

External fixator/distractor key points.
| External fixator/medial distractor avoids material at the surgical site |
| Radiolucent fixator rod |
| External fixator pins at least 5mm long |
| Proximal pin in talar neck or distal tibia |
| Divergent calcaneal pin, slightly cranial to caudal |
| Bicortical calcaneal pin |
In a standard STA we make an incision from a point 1cm distal to the tip of the peroneal malleolus to the base of the fourth metatarsal. This is an approach without nearby large vascular and nerve structures, where only branches of the sural nerve may be encountered. In the inferior and posterior part of the approach we will find the peroneal sheath, which does not need to be opened. A Hohmann retractor at the posterior part of the subtalar joint allows us to separate the tendons from the posterior part of the joint. If the view is difficult, the approach can be extended from behind the peroneal tendons. By pulling the peroneal tendons anteriorly, we can access the posterior part of the posterior facet (Fig. 9).

We can immediately see the depressed posterior facet and the fractured lateral wall (Fig. 10).

The STA for calcaneal fractures can be modified to allow better visualisation of the posterior aspect of the calcaneus and to facilitate reduction and internal plate fixation33 (Fig. 11).

This approach is taken 1.5cm more distal to the tip of the lateral malleolus, along the shaft of the calcaneus and extending from the base of the fourth metatarsal, 1cm anterior to the Achilles tendon. This approach does not involve the cutaneous vasculature and provides wide exposure of the calcaneocuboid joint, posterior facet, lateral wall of the calcaneus, and much of the calcaneal tuberosity. This wide approach allows for a larger surgical field, easier reduction, and much easier plate fixation than the traditional STA.34
Step 4. Reduction of the articular surface and its correct visualisation. ArthroscopyThe technique for reducing the articular surface varies according to the type of fracture. For AO 82B fractures, we perform an indirect reduction, using a thick K-wire. This is introduced from the posterior aspect of the calcaneus, parallel to the fracture line and with a slight lateral deviation. It should be advanced to the posterior facet of the tongue fragment (Fig. 12).

At this point, plantar flexion is performed to reduce the tension on the Achilles tendon and the tongue fragment is reduced by pressing the needle inferiorly and laterally to lift the articular surface and reduce it towards the medial constant fragment. We can use a periostotome to facilitate the reduction of the fragment and keep it reduced. At this point we check the reduction of the articular surface under direct vision and fix with K-wires, ideally the same as those used to place the cannulated screw.
In the case of 82C fractures, the reduction has to be performed directly through the STA. We can use a periostotome which we insert between the fractured lateral wall and the collapsed joint fragment. By exerting direct pressure, we lift the fragment and reduce the fracture (Fig. 13). In the rare event that we are confronted with 82C2 fracture patterns with a very lateral line, it is possible to reconstruct the joint on the table and subsequently reduce these fragments on the constant fragment (Fig. 13). Once the fragment is reduced, it is fixed with K-wires in a lateral to medial direction.

Visualisation of the reduction of the articular surface is performed by direct vision and with the aid of the fluoroscope, using the 3 projections described above. However, as the approach is limited and the joint is small and difficult to distract, the view is limited. To improve the direct view of the articular surface, we routinely use a small joint arthroscope. Introduced dry through the surgical approach, it allows us a direct view of the joint and the most medial lines, giving us information on both the quality of the reduction and the compression to be achieved with the screws (Fig. 14).

The systematic use of the arthroscope in calcaneal fractures is usually described in the context of percutaneous reduction with arthroscopic assistance and internal fixation with percutaneous screws.35 However, this is a very demanding surgical technique and only a dozen or so series have been described in the literature. Therefore, some authors combine an open, extensile, or minimally invasive approach with arthroscopy, which significantly improves joint reduction compared to fluoroscopic reduction alone, and is also associated with a shorter operating time than fluoroscopic procedures.36
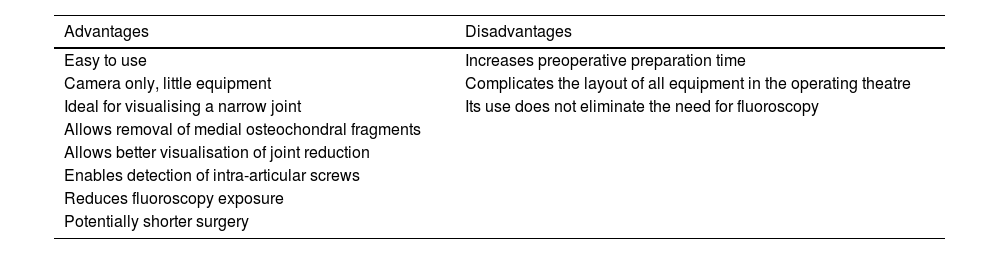
Both data confirm the importance of the systematic use of arthroscopy in the management of calcaneal fractures, and we therefore include it in our routine surgical planning (Table 2).
Advantages and disadvantages of using arthroscopy for calcaneal fractures.
| Advantages | Disadvantages |
|---|---|
| Easy to use | Increases preoperative preparation time |
| Camera only, little equipment | Complicates the layout of all equipment in the operating theatre |
| Ideal for visualising a narrow joint | Its use does not eliminate the need for fluoroscopy |
| Allows removal of medial osteochondral fragments | |
| Allows better visualisation of joint reduction | |
| Enables detection of intra-articular screws | |
| Reduces fluoroscopy exposure | |
| Potentially shorter surgery |
Provisional fixation of the posterior facet is performed with the same cannulated screw wires that will be used later for definitive fixation. Their direction is lateral to medial, with an entry distal and slightly posterior to the tip of the fibula, and with a direction of approximately about 20–30° distal, in order to fix the posterior facet to the constant fragment, the sustentaculum tali (Fig. 15). The direction is checked with the fluoroscope in the 3 projections described. Definitive fixation is performed with one or two 3–4mm cannulated screws. We then check the reduction and compression of the fragments, and the position of the screws both fluoroscopically and arthroscopically.
Step 6. Fixation of the posterior tuberosity (axis and length)
In this last step we will fix the posterior tuberosity with large, cannulated screws, between 5 and 6.5mm. The purpose of these screws is to fix the posterior tuberosity to the anterior part of the calcaneus.
In 82B fractures, tongue type, we can place a screw in the posterior part of the fragment, from superior to inferior, to fix the fragment in the tongue to the posterior tuberosity. This is done through a posterolateral percutaneous approach, in an inferior direction, thus compressing the tongue fragment against the posterior tuberosity (Fig. 16).

To fix the posterior calcaneal tuberosity, the guide wires are inserted from the posterior part of the calcaneus, in the direction of the fourth toe. Once inserted, their correct positioning is checked with lateral and axial projections, and fixed definitively with 2 screws (Fig. 17).
Different configurations of fixation with screws
There is still no clear evidence in the literature regarding screw configuration. Biomechanical studies using cadaveric or sawbone materials describe more stable fixations with less varus displacement and greater resistance to loss of posterior facet reduction with 2-screw configurations, one medial from inferior to superior in the sustentaculum tali and one lateral in the long axis towards the anterior calcaneal process37,38 (Fig. 18).
Plate osteosynthesis
Once the articular surface has been fixed, a plate inserted via the STA can be used as an alternative to screw fixation of the posterior tuberosity. While there are calcaneal plates specifically designed for use through this approach, it is also possible to use non-specific low-profile plates.
Definitive fixation with a plate does not require widening of the incision. To insert the plate, we must begin by creating a small tunnel between the fractured lateral wall and the peroneal tendons. The plate is inserted using the same approach and slid percutaneously under the peroneal tendons through the tunnel. Once the final placement of the plate has been verified under fluoroscopy, we start by placing the visible screws of the plate under the posterior articular surface, followed by the posterior tuberosity screws. The main advantages of the plate are, firstly, that it helps to compress the fractured lateral wall against the calcaneus, and secondly, if there is residual varus, we can use the plate to bring the tuberosity closer to it. In the latter case, we start with a cortical screw and, once the bone and plate are brought together, we finish with a second screw locked to the posterior tuberosity. If the plate is well positioned on the bone and the varus is well corrected, we can fixate with locked screws only (Fig. 19).
Plate vs. screw osteosynthesis
There are few studies in the literature comparing fracture fixation with percutaneous screws or with a plate inserted through the STA. Weng et al.,39 in a retrospective study comparing both fixation methods, found no significant differences in AOFAS scores, Böhler's angle, Gissane angle, calcaneal length and height between the 2 groups, except in the Sanders 3/82C2 fracture subgroup, where percutaneous screw fixation is less stable than plate fixation.
Sato et al.,40 comparing the stability of screw fixation and plate fixation via the STA, found no statistically significant differences in immediate postoperative Böhler's angle and intra-articular step. However, postoperative Böhler's angle loss was significantly less in the locking plate group than in the screw group. The AOFAS score was slightly better in the locking plate group, although this difference was not statistically significant.
Based on these 2 studies, it is possible that in more comminuted fractures (82C2 fractures) plate osteosynthesis may be an option to consider in addition to screw osteosynthesis.
Postoperative periodBone grafting is not routinely required with this procedure. The wound is closed with a 3/0 resorbable suture. A soft, highly padded dressing is applied, and a plaster cast is not required. Ankle flexion and extension movements can be performed immediately after surgery. Patients can be discharged the day after the operation and should be seen in 7–10 days. At this point rehabilitation treatment can begin. The patient can start progressive weight bearing after 6–8 weeks, depending on pain.
ConclusionAnatomical reduction of complex calcaneal fractures via the STA requires an understanding of the fracture and its associated deformities. Following the step-by-step sequence described will help to achieve a better reduction in order to achieve better functional results.
Level of evidenceEvidence level iv.
Conflict of interestsThe authors have no conflict of interests to declare.