To compare marginal fit of zirconia copings manufactured following two different systems: CAD/CAM Cerec InLab (Sirona®) and Zirkonzahn (Zirkonzahn®) as well as a Zirkograph 025 ECO (Zirkonzahn®) pantograph system.
Material and methodsA master Cr-Co model stump was manufactured; it was prepared for the zirconia crown of an upper premolar. Ten zirconia copings were manufactured for each group following manufacturer's instructions. Control group consisted on ten metallic copings. A replication technique was followed using elite HD+ polyvinyl siloxane (Zhermack®). Measurements were taken using a stereomicroscope at 50x magnification so as to obtain marginal width in microns and thus determine absolute marginal discrepancy of each coping. Statistical analysis was conducted using IBM SPSS® software. T-test study was conducted in order to compare obtained data.
ResultsMean marginal absolute discrepancy and marginal width were as follows: 92.14 ± 38.59 and 78.62 ± 31.33μm for Cerec InLab (Sirona®) CAD/CAM system, 38.71 ± 12.62 and 36.91 ± 13.56μm for Zirkonzahn (Zirkonzahn®) CAD/CAM system, 77.92 ± 38.01 and 69.42 ± 33.23μm for Zirkograph 025 ECO (Zirkonzahn®) pantograph system. Control group made of metal copings exhibited 44.11 ± 15.36 and 43.74 ± 15.70μm. With respect to absolute marginal discrepancy and marginal width, significant differences were observed when comparing Cerec InLab (Sirona®) and Zirkograph 025 ECO (Zirkonzahn®) with control group. Nevertheless, no significant differences were observed between Zirkonzahn (Zirkonzahn®) CAD/CAM system and the control group. Overall level of statistical significance was p > 0.001.
ConclusionsZirkonzahn® CAD/CAM system was the most accurate system of all. CAD/CAM Cerec InLab system (Sirona®) proved to be the less precise system.
Comparar la precisión marginal de cofias de zirconia elaboradas empleando dos sistemas CAD/CAM Cerec InLab (Sirona®) y Zirkonzahn (Zirkonzahn®) y un sistema pantográfico Zirkograph 025 ECO (Zirkonzahn®).
Material y métodosSe elaboró un muñón maestro de Cr-Co con preparación para corona de zirconia de un premolar superior. Se fabricaron 10 cofias de zirconia por grupo siguiendo los parámetros de cada sistema. El grupo control consistió en 10 cofias metálicas. Se ejecutó una técnica de réplica, utilizando polivinilsiloxano elite HD+ (Zhermack®). Mediante observación estereomicroscópica con aumento de 50x, se determinó, en micras, la discrepancia marginal absoluta y el espesor marginal de un punto por cara de cada cofia. El análisis estadístico se ejecutó con el software IBM SPSS®. Para comparar los datos obtenidos se realizó el test t.
ResultadosLa discrepancia marginal absoluta media y el espesor marginal fue 92.14 ± 38.59 y 78.62 ± 31.33μm para el sistema CAD/CAM Cerec InLab (Sirona®), 38.71 ± 12.62 y 36.91 ± 13.56μm para el sistema CAD/CAM Zirkonzahn (Zirkonzahn®), 77.92 ± 38.01 y 69.42 ± 33.23μm para el sistema pantográfico Zirkograph 025 ECO (Zirkonzahn®) y 44.11 ± 15.36 y 43.74 ± 15.70μm para el grupo control. Existieron diferencias estadísticamente significativas entre los sistemas Cerec InLab (Sirona®) y Zirkograph 025 ECO (Zirkonzahn®) en comparación con el grupo control para la discrepancia marginal absoluta y el espesor marginal. No existieron diferencias estadísticamente significativas entre los sistemas CAD/CAM Zirkonzahn (Zirkonzahn®) y el grupo control. El nivel de significancia fue p significance was p > 0.001.
ConclusionesEl sistema más preciso fue CAD/CAM Zirkonzahn (Zirkonzahn®). El sistema que mostró menor precisión marginal fue Cerec InLab (Sirona®).
Esthetic concerns have fostered the creation of ceramic dental materials used to manufacture metalfree crowns. Presently, due to its hardness and resistance, zirconium dioxide is used to manufacture copings for partial fixed prostheses. Zirconia can be used in CAD/CAM and pantographic systems1 CAD/CAM systems operate by scanning a physical object transformed into a 3D image through a graphic design software. The design is sent to a robotic drilling device in order to obtain the final product.2
Manufacture of restorations by means of pantographic systems consists on the making of a replica that can be used as a guide; this device can be replicated in the desired material.3
As a rule, presintered zirconia is used in its porous initial state. Later sintering produces a 20-30%4 polymerization contraction, and it can be associated to defects in the resulting marginal precision.5 Zirconia is used as yttrium partially stabilized (Y-TZP) tetragonal zirconia, with excellent biocompatible, mechanical and esthetic properties.6 Resistance to fracture is associated to the zirconia hardness transformation phenomenon. This hardness was acquired during the change of tetragonal to monoclinic phase.7
In the manufacture of fixed prostheses, marginal precision is a factor of the utmost importance, since marginal fit defects produce long term failure of the rehabilitating treatment. Presence of space between coping and stump contributes to bio-film formation. As a consequence, gingival inflammation occurs as well as development of secondary caries.8 A study conducted on zirconia restorations after five year cementation determined the presence of secondary caries in 22% of cases.9 Marginal lack of precision increases bacterial prevalence in the mouth, incrementing thus periodontal disease incidence. Micro-leakage can produce endodontic problems.10 Cement dissolution and later de-cementation of the restoration are also possible.11 Very thick cement layers increase tension strength in crown surfaces, producing porcelain wear.4 Acceptable space between coping and tooth must be under 120 μm.12
The aim of the present study was to compare marginal precision of zirconia copings with use of the following systems: CAD/CAM Cerec InLab (Sirona®), CAD/CAM Zirkonzahn (Zirkonzahn®) and Zirkograph 025 ECO pantographic system (Zirkonzahn®). The project's hypothesis was that marginal fit of zirconia copings manufactured with the pantographic system Zirkograph 025 ECO (Zirkonzahn®).
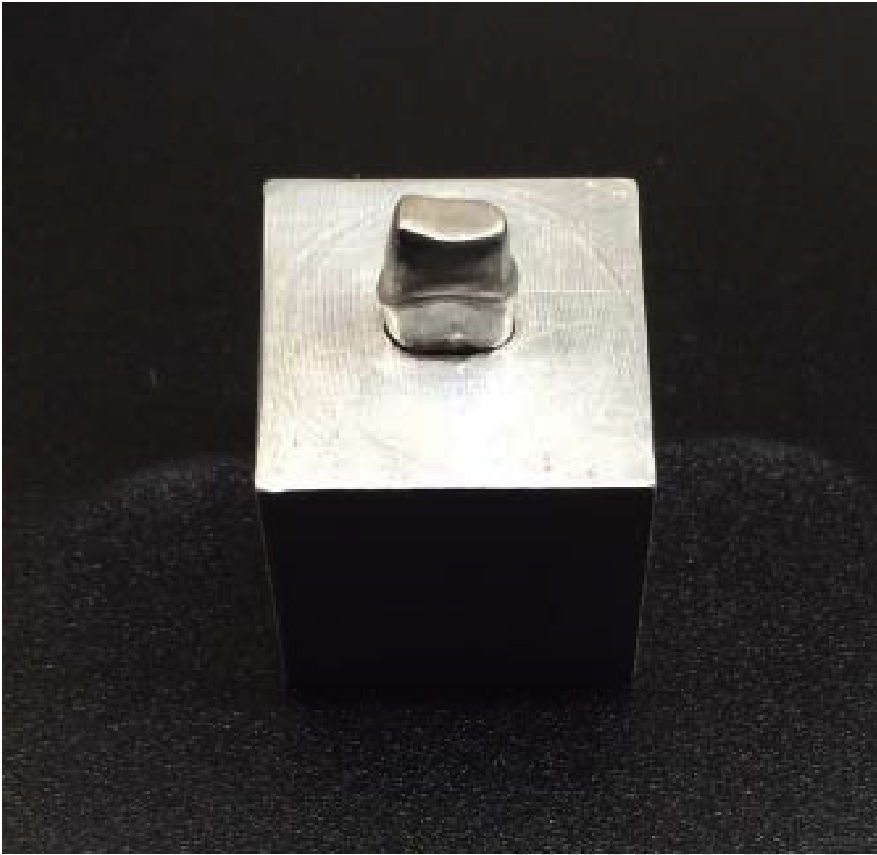
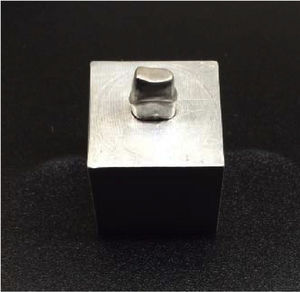
METHODAn in vitro explicative, experimental and comparative study was conducted. A Cr-Co master model was fabricated, based on an ivorine preparation for zirconia crown of an upper premolar. Proximal shaping consisted on a 1mm lingual and vestibular proximal reduction, and 1.5mm in occlusal direction, with a rounded-shoulder gingival margin. This same carving was replicated in a Cr-Co master model, with aluminum based cubic design supporting structure (Figure 1). All samples were manufactured on that model.
Ten copings were manufactured for each system according to manufacturers’ instructions. Four groups were established, one for each of the following systems: CAD/CAM Cerec InLab (Sirona®), CAD/CAM Zirkonzahn (Zirkonzahn®), Zirkograph 025 ECO (Zirkonzahn®) as well as one control group formed by metallic copings (Figure 2). Pre-sintered zirconia was used, which later completed sintering according to instructions for each system. Control group was formed by ten metallic copings manufactured following the lost wax system.
Copings were disinfected with 70% ethanol, this procedure was followed by an ultrasonic disinfection in water for 5minutes.
Internal impressions of each coping were taken following replication technique. To this end light weight polyvinyl siloxane was used.
Elite HD+ Super Light Body Fast Set (Zhermack®) was used as well as heavy weight polyvinyl siloxane elite HD+ Putty Soft Normal Set (Zhermack®). A constant 50N force device was designed.1I This device was gauged at the Ecuador Institute of Normalization (Instituto Ecuatoriano de Normalización [INEN]), in order to control settling force of each coping on the master stump. This procedure was conducted under the supervision of Dr. Fernando Sandoval, at the Research Area of the School of Dentistry of the San Francisco de Quito University.
Stored samples were kept in a dry environment, 24hours after taking the impression longitudinal sections were executed for observation under stereoscopic microscope Meiji Techno EMZ-13TR (Meiji Techno®) at a 50x magnification.
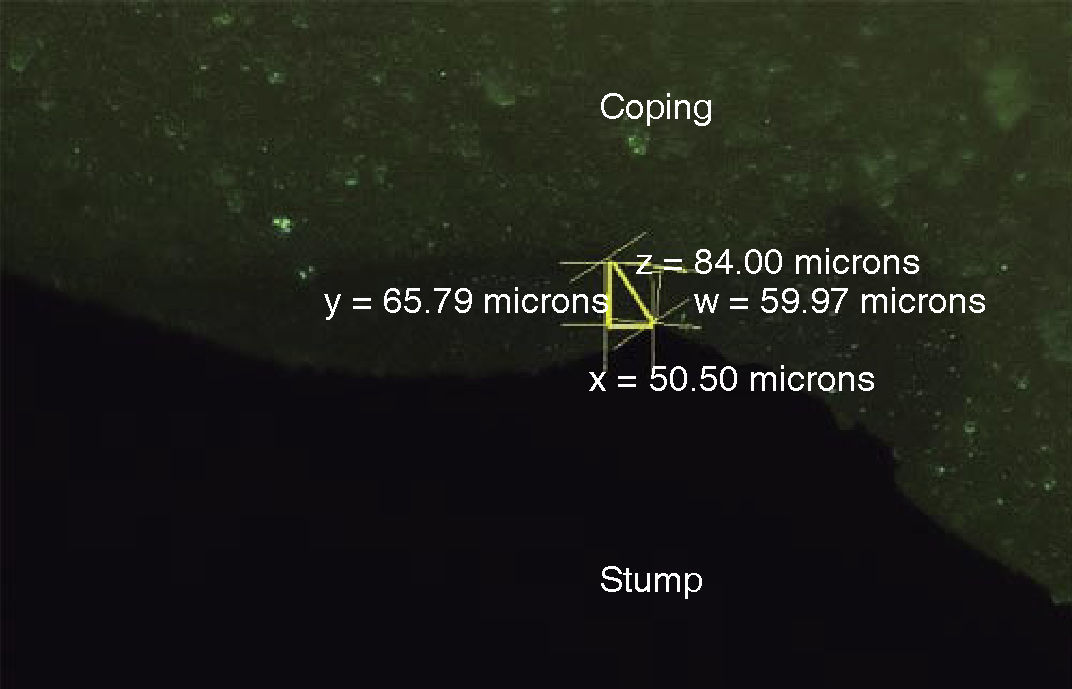
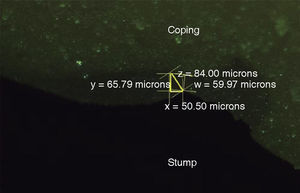
One point per side in each coping was analyzed at marginal level. Marginal width (w) was measured in microns, and absolute marginal discrepancy was determined (z). To this effect, the method standardized by Holmes et al13 was used: this method measures horizontal (x) and vertical (y) marginal discrepancy. Measurements photographs were taken with Infinity 1 software (Lumera®) (Figure 3). Said photographs were approved by Dr. Fernando Sandoval, Dean of the School of Dentistry, University San Francisco de Quito. Statistical analysis was conducted with SPSS IBM® software. Obtained data and significance were executed with t test.
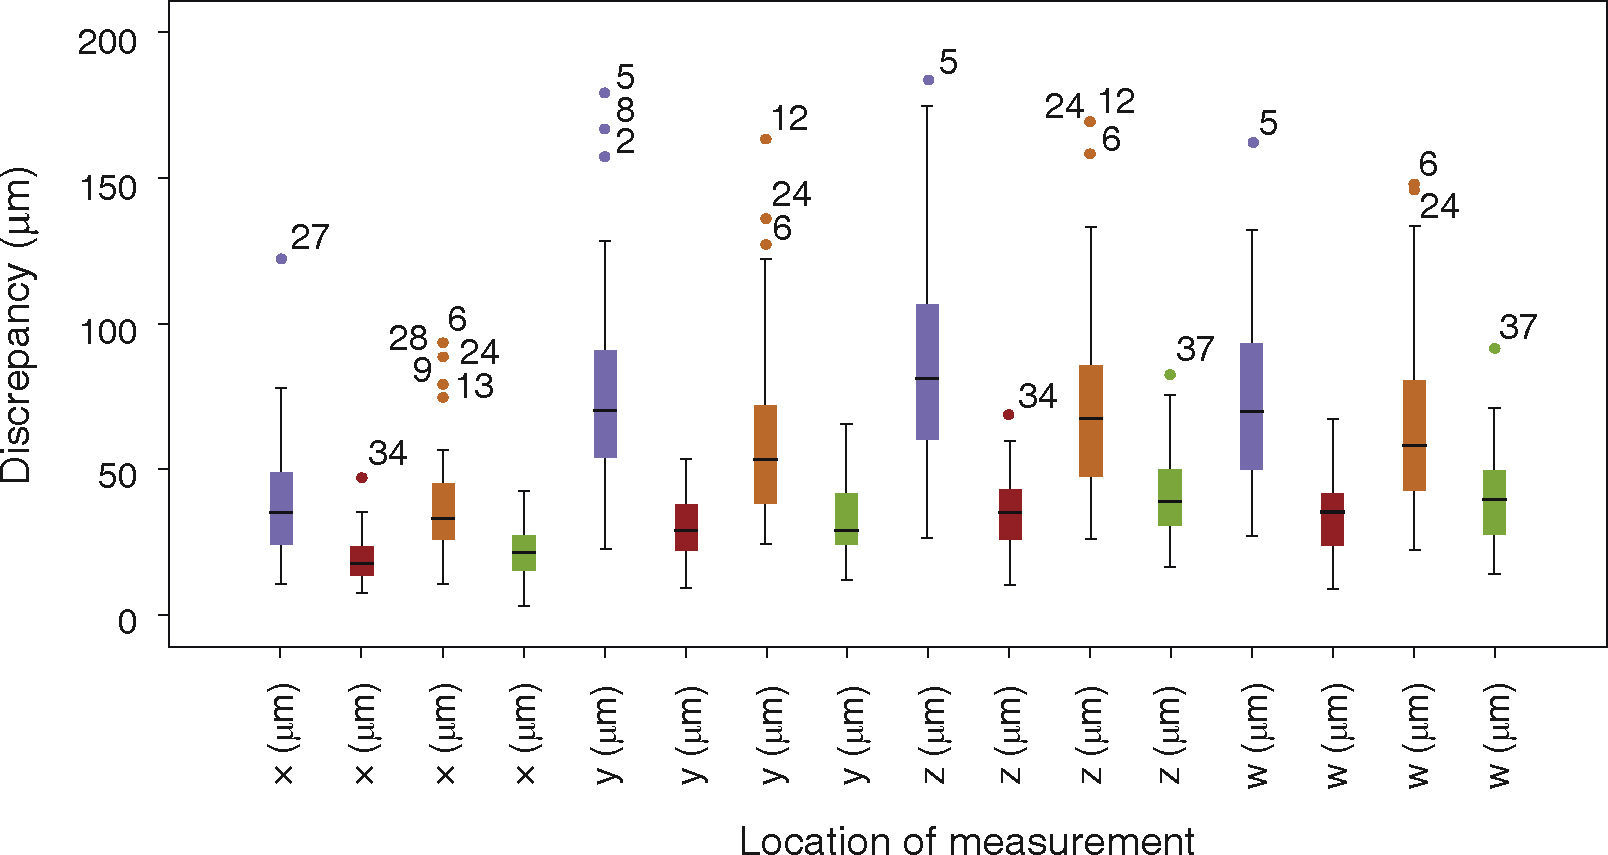
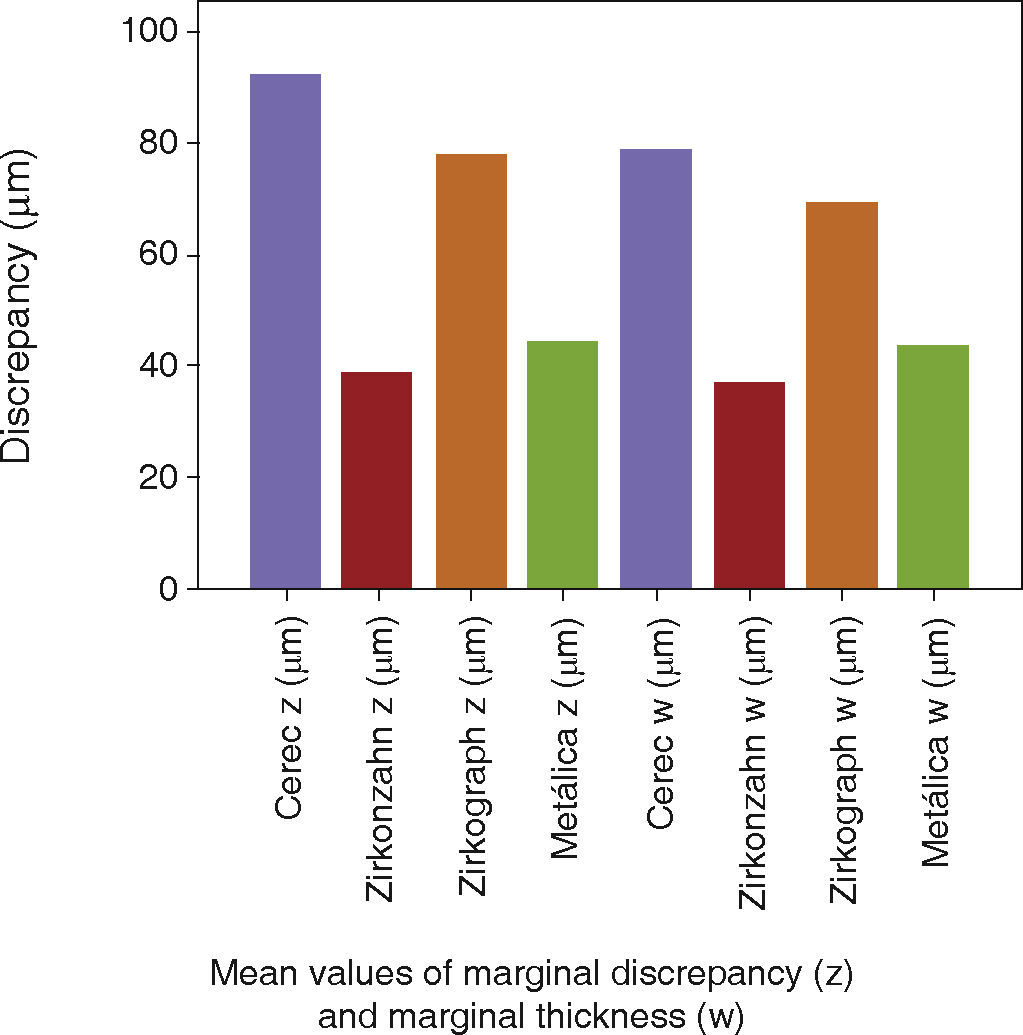
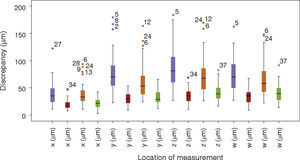
RESULTSMean absolute marginal discrepancy and mean marginal thickness were 92.14 ± 38.59 and 78.62 ± 31.33μm for CAD/Cam Cerec InLab (Sirona®) system; 38.71 ± 12.62 and 36.91 ± 13.56μm for CAD/CAM Zirkonzahn (Zirkonzahn®); 77.92 ± 38.01 and 69.42 ± 33.23 μm for pantographic system Zirkograph 025 ECO (Zirkonzahn®) and 44.11 ± 15.36 and 43.74 ± 15.70 μm for the metallic copings control group (Figure 4). The CAD/CAM Zirkonzahn group (Zirkonzahn®) presented lower values of absolute mean marginal discrepancy and mean marginal thickness; it was followed by the control group of metallic copings, with an error in standard deviations lesser than 5% (3.17%). The group with greater mean marginal discrepancy (vertical, horizontal and absolute) and mean marginal thickness was Cerec InLab (Sirona®) (Figure 5). With t test, statistically significant differences were recorded at the absolute marginal discrepancy (y) and marginal thickness (w) between groups Cerec InLab (Sirona®) and Zirkograph 025 ECO (Zirkonzahn®), in comparison with the control group of metallic copings (p = 0.0009) (p < 0.001). No statistically significant results were observed between CAD/CAM groups Zirkonzahn (Zirkonzahn®) and control group (p > 0.001).
Box plot representing distribution of horizontal (x), vertical (y) absolute (z) and marginal thickness (w) dimensions obtained in all analyzed systems. Color images can be found at:www.medigraphic.com/facultadodontologiaunam*Colors: purple Cerec InLab (Sirona®) CAD/CAM system; red: Zirkonzahn (Zirkonzahn®) system; orange: Zirkograph (Zirkonzahn®) system; green: metallic copings.
In the present study, copings manufactured with CAD/CAM Zirkonzahn® system proved to be the most precise. Copings manufactured with CAD/CAM Cerec InLab system (Sirona®) exhibited greatest marginal discrepancy, with maximum values above clinically accepted values in literature. Therefore, the hypothesis offered for the present study was partially accepted, since copings manufactured with CAD/CAM system Zirkonzahn® exhibited the greatest marginal precision.
Statistically significant differences between both assessed CAD/CAM groups could be due to factors related to the digitization of each system. Both systems are subject to limitations related to the scanning finite resolution. According to Reich et al,14 marginal precision errors are due to the formation or rounded angles or peaks formed due to the scanning optical system. Moreover, the use of opacifying spray for scanning might inhibit refl ection during the process, causing increase of the marginal thicknesses. Studies conducted by Beuer et al,15 Grenade et al16 and Kohorst et al17 also determined the fact that CAD/CAM elaboration processes (drilling and sintering) significantly affect marginal discrepancy. Influence of operator and dental clinican14,15 establish the high sensitivity of the CAD/CAM technique.
Reich et al14 determined a 65μm marginal discrepancy for zirconia copings of Cerec InLab system (Sirona®). The study of Caparroso, Marín and Velásquez18 established a 47.34μm marginal thickness, Bindl and Mormann19 established 43μm, Beuer et al15 established 57μm. When comparing the aforementioned values with those obtained in the present study, it can be established that the obtained mean marginal discrepancy value (78.62μm) was greater than that reported in scientific literature.
Marginal discrepancy values of the Zirkograph 025 ECO system (Zirkonzahn®) were above those obtained with the CAD/CAM Zirkonzahn system, but below to those achieved with the CAD/CAM Cerec InLab (Sirona®) system. Santamaría, Aldana and Martín20 assessed the systems CAD/CAM Cerec InLab (Sirona®) and Zirkograph 025 ECO (Zirkonzahn®) systems; in their pantographic study they found a greater marginal discrepancy of 121.3μm than that obtained in the present study. Park et al21 established statistically significant differences between CAD/CAM and pantographic systems, and determined that the pantographic system exhibited better coping marginal precision. This concurs with findings of the present study which compared CAD/CAM Cerec InLab® and Zirkograph 025 ECO (Zirkonzahn®) groups.
Statistically significant differences were established between Zirkograph 025 ECO (Zirkonzahn®) pantographic system and the metallic copings control group. In the present study as well as in other assessed studies found in scientific literature, mean marginal discrepancy was found to be below 120 μm, and therefore, was clinically accepted. The greater marginal discrepancy of pantographic systems is due to the greater influence exerted by applied manual procedures.
Caparroso, Marín and Velásquez18 determined that metallic copings exhibited better marginal adaptation than zirconia copings manufactured with the CAD/CAM Cerec InLab (Sirona®) system. This result concurs with the result obtained among CAD/CAM Cerec InLab (Sirona®) groups and the control group. Bindl et al19 stated there was no statistically significant difference in precision margin when comparing CAD/CAM systems and the metallic copings conventional technique. This concurs with results obtained in the present study of CAD/CAM Zirkonzahn groups (Zirkonzahn®) and control group. Reich et al14 established that resulting marginal discrepancy of Cerec InLab (Sirona®) system was similar to that obtained in metallic copings. This result does not concur with data of our study for the same CAD/CAM system, but it does concur for the CAD/CAM Zirkonzahn (Zirkonzahn®) system.
Vodjani et al22 established that metal-porcelain crowns manufactured with conventional technique exhibited better marginal precision than CAD/CAM system crowns. This assertion in true among Cerec InLab (Sirona®) systems and the control group, but is not applicable to CAD/CAM Zirkonzahn (Zirkonzahn®) system and the control group.
Due to the contraction of the siloxane polyvinyl used in the replication technique, marginal discrepancy measures could indeed be lower than real measurements. In later research projects it is suggested to additionally conduct other marginal fit determination techniques such as cementation crosssectioned techniques.
CONCLUSIONSCAD/CAM Zirkonzahn system (Zirkonzahn®) exhibited the lowest absolute marginal discrepancy, it was followed by the metallic copings groups; no statistically significant differences were found between these two groups. The less precise system was CAD/CAM Cerec InLab (Sirona®), which exhibited statistically significant differences in all studied groups. Marginal precision of CAD/CAM systems depended on the manufacturing processes of each separate system. In all groups mean values of absolute discrepancy and marginal thickness were lower than 120 μm, therefore, they were clinically acceptable.


