In this study, an Inconel 625-Cr3C2 cermet coating was deposited on a steel alloy by laser cladding. The elastic and plastic mechanical properties of the cermet matrix were studied by the depth sensing indentation (DSI) in the micro scale. These results were compared with those obtained from an Inconel 600 bulk specimen. The values of Young's modulus and hardness of cermet matrix were higher than those of an Inconel 600 bulk specimen. Meanwhile, the indentation stress–strain curve of the cermet matrix showed a strain hardening value which was more than twice the one obtained for the Inconel 600 bulk. Additionally, the mechanical properties of unmelted Cr3C2 ceramic particles, embedded in the cermet matrix were also evaluated by DSI using a spherical indenter.
En este estudio, se han depositado recubrimientos cermet de Inconel 625-Cr3C2 sobre acero mediante plaqueado láser. Las propiedades mecánicas elasto-plásticas de la matriz de cermet fueron estudiadas mediante el proceso de nanoindentación (DSI) a escala microscópica. Los resultados obtenidos se han comparado con los correspondientes a una muestra masiva de Inconel 600. Los valores del módulo de Young y la dureza de la matriz de cermet son considerablemente mayores que los de la muestra masiva de Inconel 600. La curva de tensión-deformación de la matriz de cermet presenta un valour de endurecimiento por deformación que es más del doble del obtenido para el Inconel 600 en masa. Además, se determinaron las propiedades mecánicas de las partículas cerámicas de Cr3C2 sin fundir en la matriz de cermet mediante nanoindentación usando un indentador esférico.
Cermet coatings were developed to protect the metallic substrate in high-temperature applications. The idea is to combine the hardness, oxidation resistance and high melting temperature of ceramic particles with the ductility, toughness and high thermal conductivity of metals. Different combinations of metal alloys and ceramics were blended and deposited to obtain cermet coatings [1,2].
Nickel-based superalloys are characterized by high-temperature oxidation and corrosion resistance. The commercial name Inconel is used to identify a group of Ni-based superalloys mainly composed by Ni and Cr. These alloys were demonstrated to be suitable to be deposited as a coating by laser cladding to protect substrate materials, like steel [3–5]. One way to improve the tribological properties of metallic coatings applied by laser cladding is to introduce ceramic particles in the filler material [6]. It has been shown that Inconel 625 and Cr3C2 particles could be used for this purpose [7]. The microstructure, the wear behaviour, and the mechanical properties of Inconel coatings have been studied in the literature [4,7–16]. Additionally, a recent study on the fracture and failure mechanisms of Ni-base laser cladding coatings was performed using in situ tensile tests [17]. However, few researches about the local mechanical behaviour in a micro-scale of Inconel cermet coatings have been carried out.
The aim of this work is to study the mechanical properties in the micro-scale of Inconel 625-Cr3C2 cermet coatings deposited by laser cladding. The elastic-plastic properties of the cermet matrix obtained by depth-sensing indentation (DSI) were compared with those of an Inconel 600 bulk specimen. In addition, for a more in situ analysis of the coatings, the properties of unmelted Cr3C2 ceramic particles, embedded in the in the cermet matrix, were also evaluated by DSI.
Materials and experimental proceduresMaterialsInconel 625-Cr3C2 cermet coating was deposited by laser cladding onto Gr22 ferritic steel (ASTM A387). Inconel 625 and Cr3C2 powders were supplied by Sulzer-Metco (MetcoClad 625 and Metco 70C-NS, respectively). The composition of Inconel 625 powder and the Inconel 600 bulk are presented in Table 1. The Inconel 625 powders were mechanically mixed with the 20wt% of Cr3C2 before processing the cermet coatings.
Experimental procedureA Rofin-Dilas High-Power Diode Laser (HPDL) with a wavelength of 940nm and a maximum output power of 1300W was used. Argon was applied as a protective and powder carrier gas. In order to deposit the cermet coatings, the laser beam power was fixed at 900W, the scanning speed at 15mm/s, the powder feeding rate at 16.5g/min, and the flux of Ar between 14 and 15l/min. The substrates were coated by 10 single clad tracks with a 40% overlap between two adjacent tracks [7].
Metallographic samples were prepared in plain-view section. The coated specimens were grounded with SiC paper up to 1200grit to remove the superficial roughness of the coatings. Successively, they were polished in a diamond slurry of up to 1μm nominal size. Finally, the polished surfaces were cleaned in deionised water and then by ultrasound in acetone and propanol. The same procedure was followed to obtain a polished surface of the Inconel 600 bulk sample.
Depth sensing indentations tests (DSI) were performed with a Nanoindenter XP (MTS systems Co.), on the polished surfaces of the samples, by using the continuous stiffness measurement methodology (CSM) [18]. Continuous loading and unloading cycles were conducted during the loading branch by imposing a small dynamic oscillation of 2nm and 45Hz on the displacement signal and measuring the amplitude and phase of the corresponding force. Consequently, the contact stiffness was continuously measured as a function of the penetration depth during the experiment. Two different batches of indentation tests were carried out on Inconel bulk and cermet samples. For each batch, an indentation matrix of 10×10 indentations, spaced 50microns between them, was performed in displacement control. The first batch of indentation tests was carried out using a Berkovich diamond indenter with a tip radius of 50nm. A maximum penetration depth of 1000nm was selected to perform the DSI tests with the Berkovich tip. The aim of these tests was to obtain values of Young's modulus (E) and hardness (H) of the studied materials. Both properties were obtained by following the Oliver–Pharr methodology [19]. The other batch of indentation tests was conducted using a spherical diamond indenter with a tip radius of 10μm. The aim of these tests was to study the local plastic properties and to obtain the indentation stress–strain curve of both samples. A maximum penetration depth of 1500nm was selected to perform the DSI tests with the spherical tip. Prior to making the Berkovich indentations, a tip calibration procedure was carried out using the bulk Inconel 600 alloy as the reference material, according to the CSM methodology [3,19,20]. The nominal elastic modulus was set to 214GPa and the real contact area of the indenter was iteratively obtained through the following equation.
where ci are constants determined by curve fitting procedure. The first term was set to 24.5 for an ideal Berkovich indenter.In addition, Vicker microhardness indentation tests were carried out on the polished surfaces of the studied materials, with a maximum load of 300gf and a dwell time of 12s.
Results and discussionDSI tests with Berkovich indenter tipIn a previous work [7], the microstructure of the cermet matrix was analyzed by scanning electron microscopy (SEM) and transmission electron microscopy (TEM). Unmelted Cr3C2 ceramic particles were randomly distributed in the Inconel matrix. Additionally, Cr-rich carbides of stoichiometry M7C3, radially distributed around the unmelted Cr3C2 particles, were also observed. They were formed in situ during the laser cladding process.
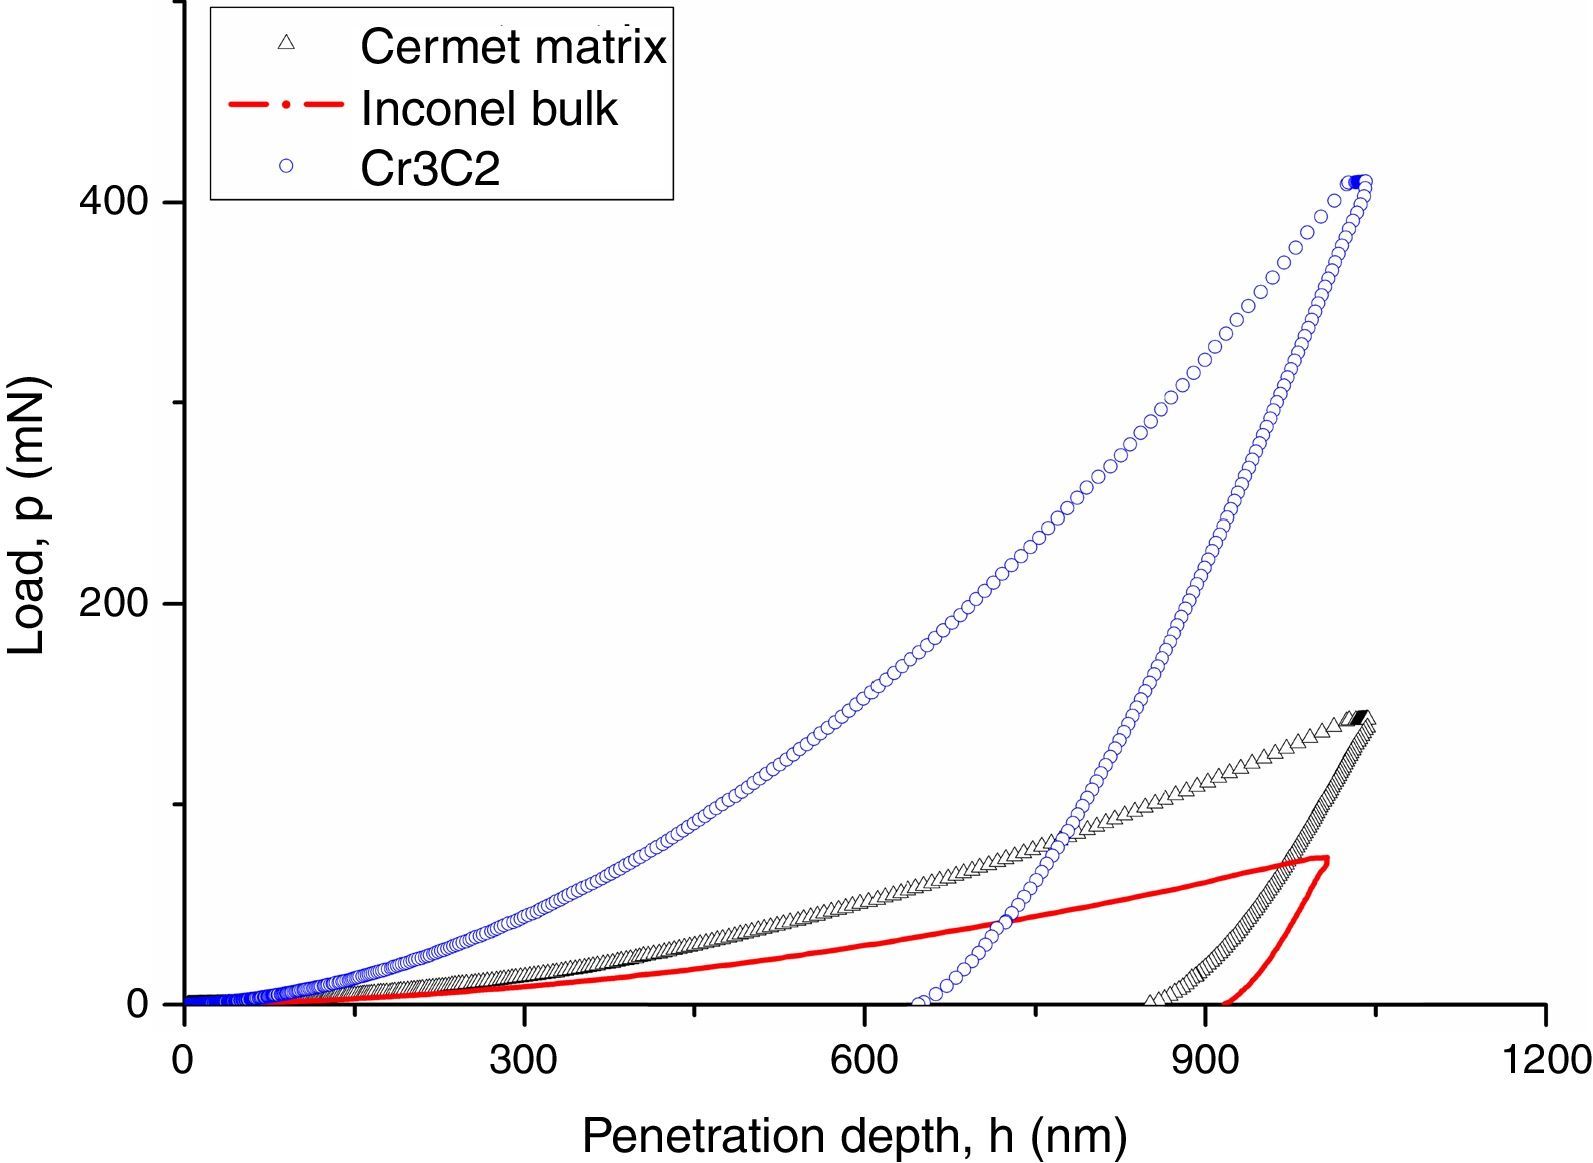
Fig. 1 shows a representative indentation load vs. penetration depth curves obtained from the DSI tests performed with the Berkovich tip. The indentation loads at the maximum penetration of 1000nm for the tests done in the cermet matrix were twice as much those obtained on Inconel bulk. Additionally, the Cr3C2 carbides showed the highest indentation loads, almost four times those on Inconel bulk.
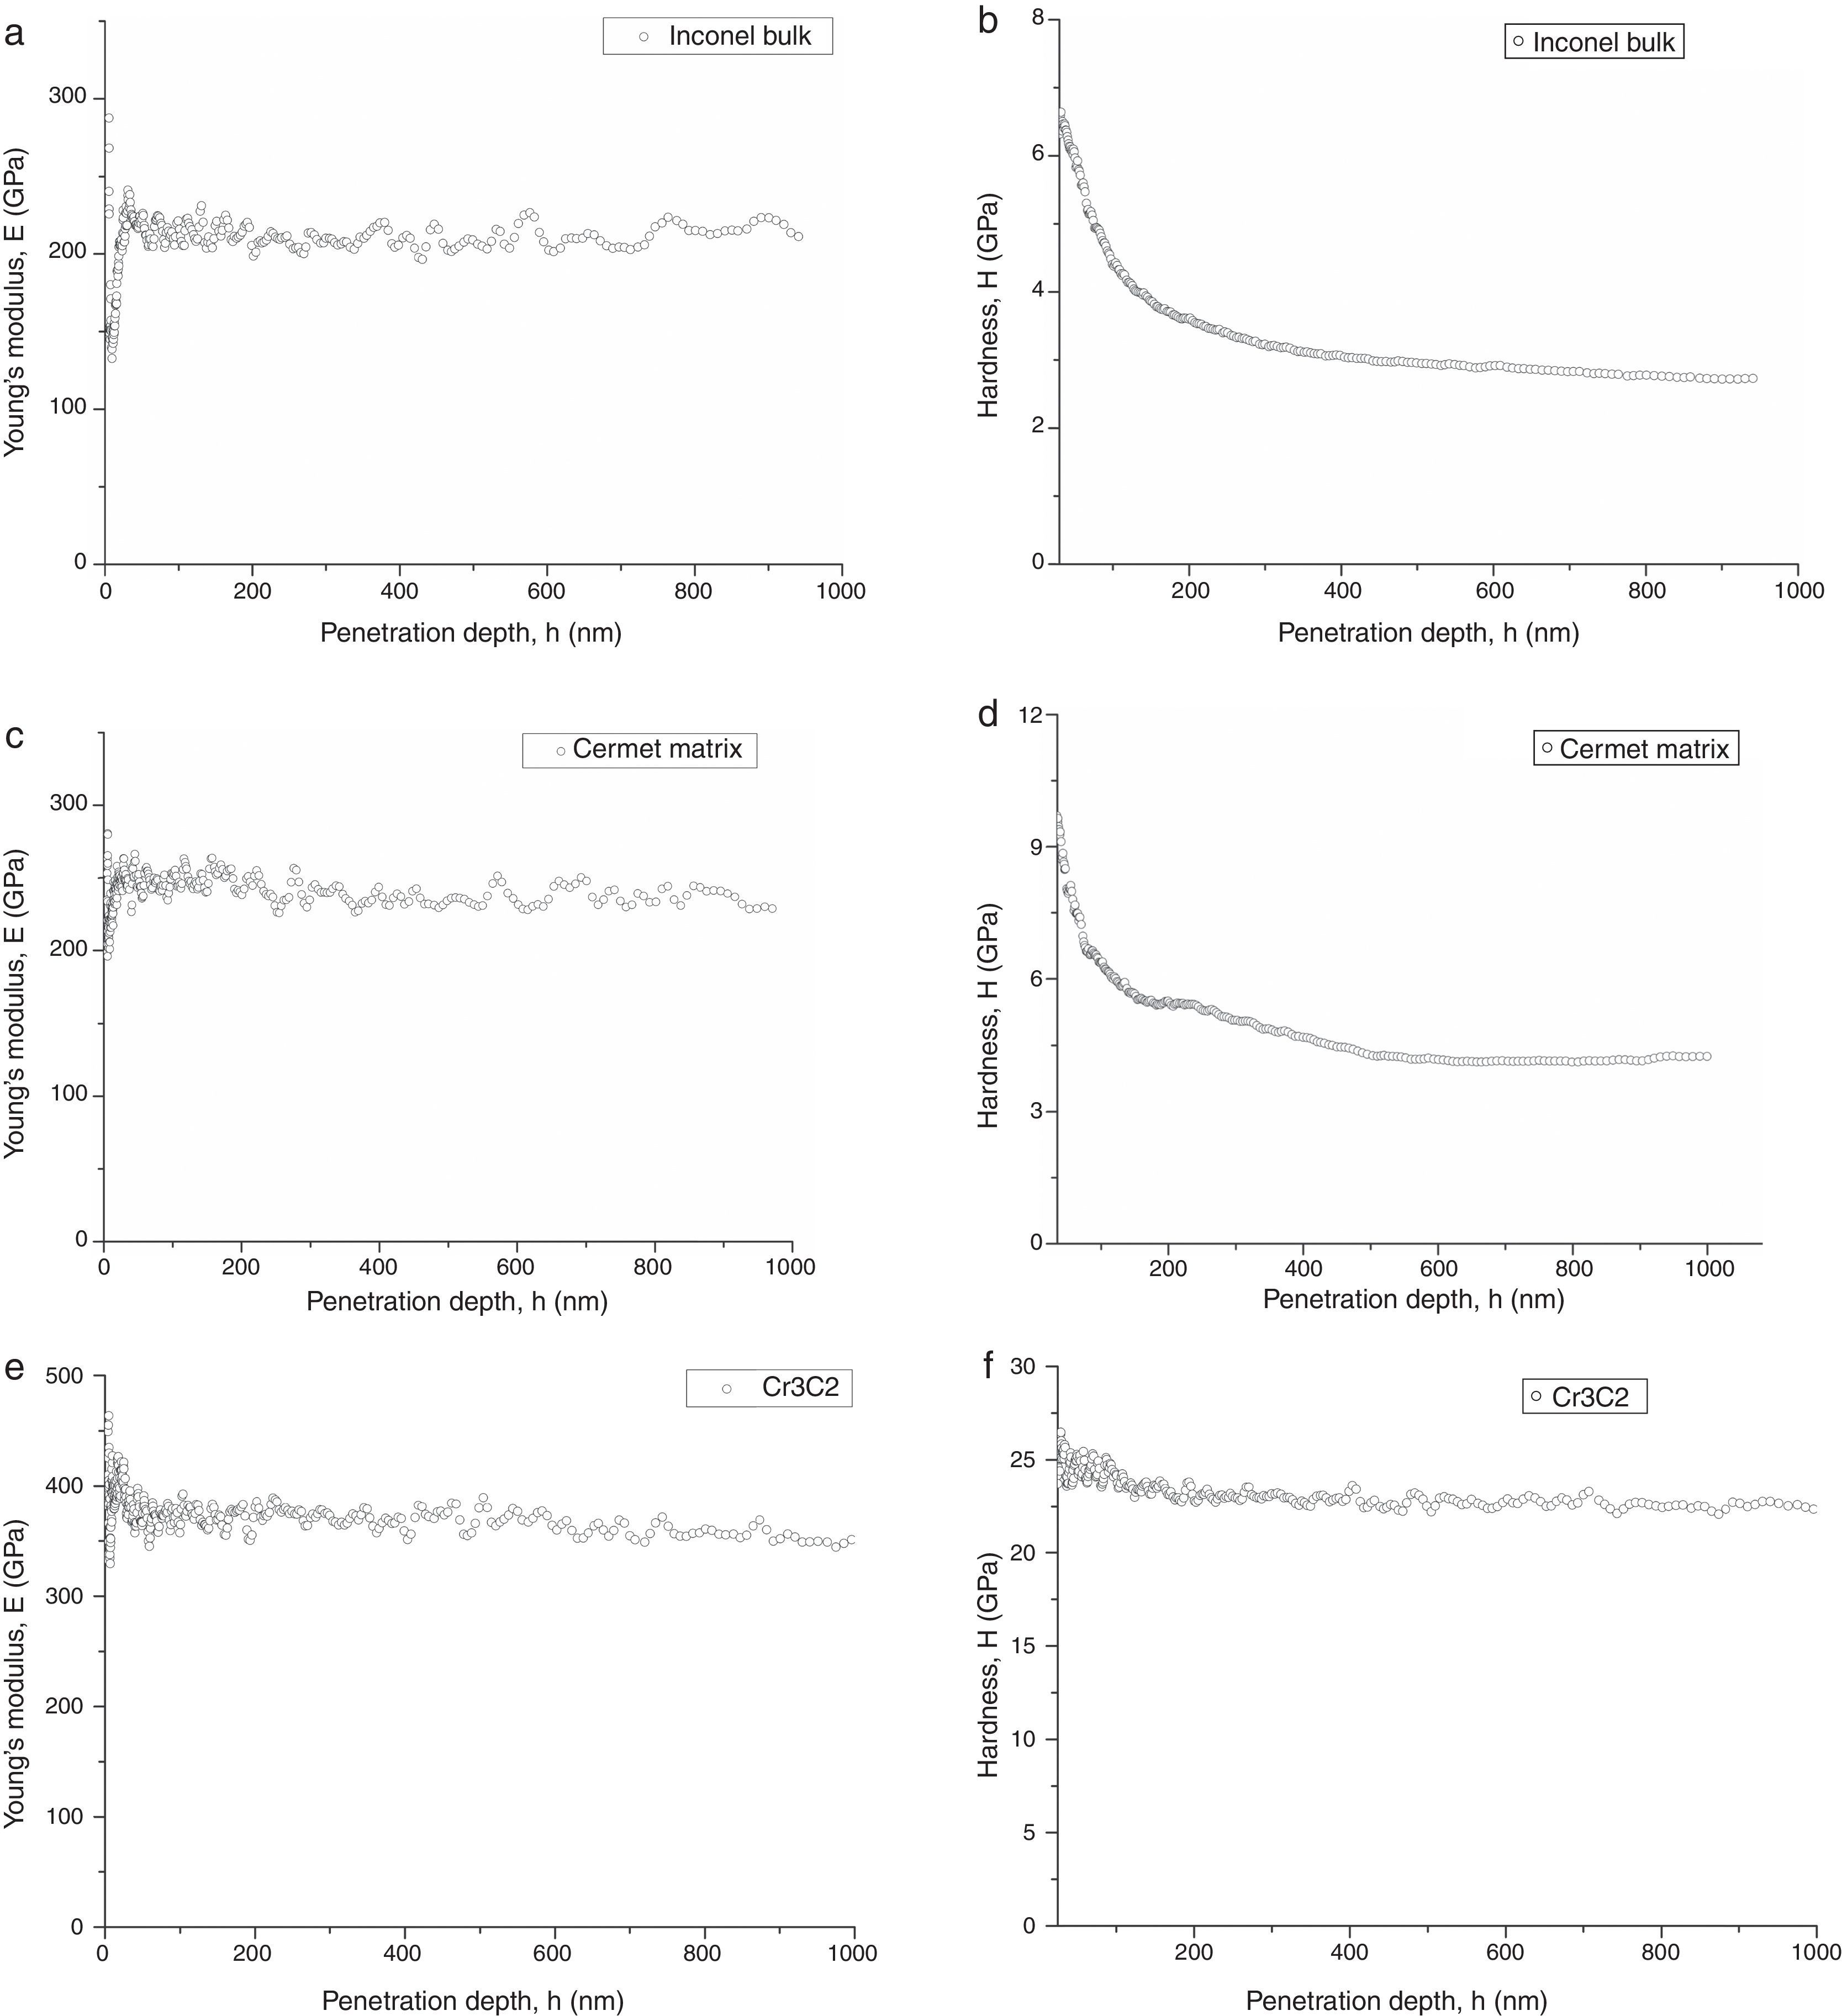
Fig. 2 shows representative examples of Young's modulus vs. penetration depth and hardness vs. penetration depth curves obtained in the DSI tests. The Young's modulus of the studied materials does not change considerably with the penetration depth. Examples of results of the variations of the hardness with the penetration depth are shown in Fig. 2(b), (d), and (f). The unmelted Cr3C2 ceramic particles showed almost constant values of hardness with the penetration depth. However, the cermet matrix and the Inconel 600 bulk showed a continuous decreasing tendency of the hardness values with the penetration depth.
As the values of E remain quite constant, it is possible to discard the occurrence of calibration error in the area function of the indenter tip in Eq. (1). Consequently, the hardness evolution observed with the penetration depth may be a material response to the indentation process. This phenomenon is known as indentation size effect (ISE) [21] and the hardness values obtained on the cermet coating could be affected by this effect. Different models have been developed to analyze the ISE and calculate the asymptotic hardness (H0) at the fully plastic condition. This value of the hardness is comparable to the Vickers one at macroscale. Nix and Gao [21] proposed a methodology to determine this asymptotic hardness. Due to the very high strain gradient that is induced in the sample during indentation with sharp tips, Geometrically Necessary Dislocations (GNDs) are produced in the indentation volume. The GND's are added to the Statistically Stored Dislocations (SSD's) related to the equivalent strain reached in the test. As a result, the dislocation density increases and thus justifies the hardening effect observed here. Moreover, the smaller the size of the indentation, the more important the strain gradient appears to be. Hence, the hardening effect becomes more noticeable as the indentation size is reduced. By applying the model developed by Nix and Gao, Eq. (2) can be used to describe ISE [22]:
where H represents the apparent hardness; H0 the asymptotic hardness; h the penetration depth, and h* is a characteristic length that depends on the properties of the indented material and the indenter geometry.Eq. (2) implies that a plot of H2 vs. 1/h results in a straight line that will intercept the y-axis at H02. Fig. 3 shows a representative plot of H2 vs. 1/h for the Inconel 600 bulk (a) and cermet matrix (b), respectively. A very good linear fitting of the data is obtained in accordance with the Nix and Gao model. This behaviour has also been reported in the zirconium [23].
Table 2 summarizes the average hardness measured from DSI tests done with the Berkovich indenter, the values of H0 calculated with the Nix and Gao model, and finally the values of Vicker microhardness (HV) that could be used to verify if the values of H0 were correctly calculated. The asymptotic hardness values obtained on Inconel bulk and cermet coating are similar to those obtained by Vickers microhardness tests. In addition, the asymptotic hardness value of the cermet matrix is 60% higher than that of the Inconel 600 bulk. The higher hardness value of the cermet matrix may be due to the formation of the M7C3 carbides previously described. The Young's modulus of the cermet matrix was 15% higher regarding to that obtained on the Inconel 600 bulk. It is possible to suppose that M7C3 carbides, embedded into the Inconel matrix, promote a load distribution phenomena that results in higher values of E measured. The values of E obtained for the Cr3C2 particles are similar to those reported by others authors (E=373GPa) [24].
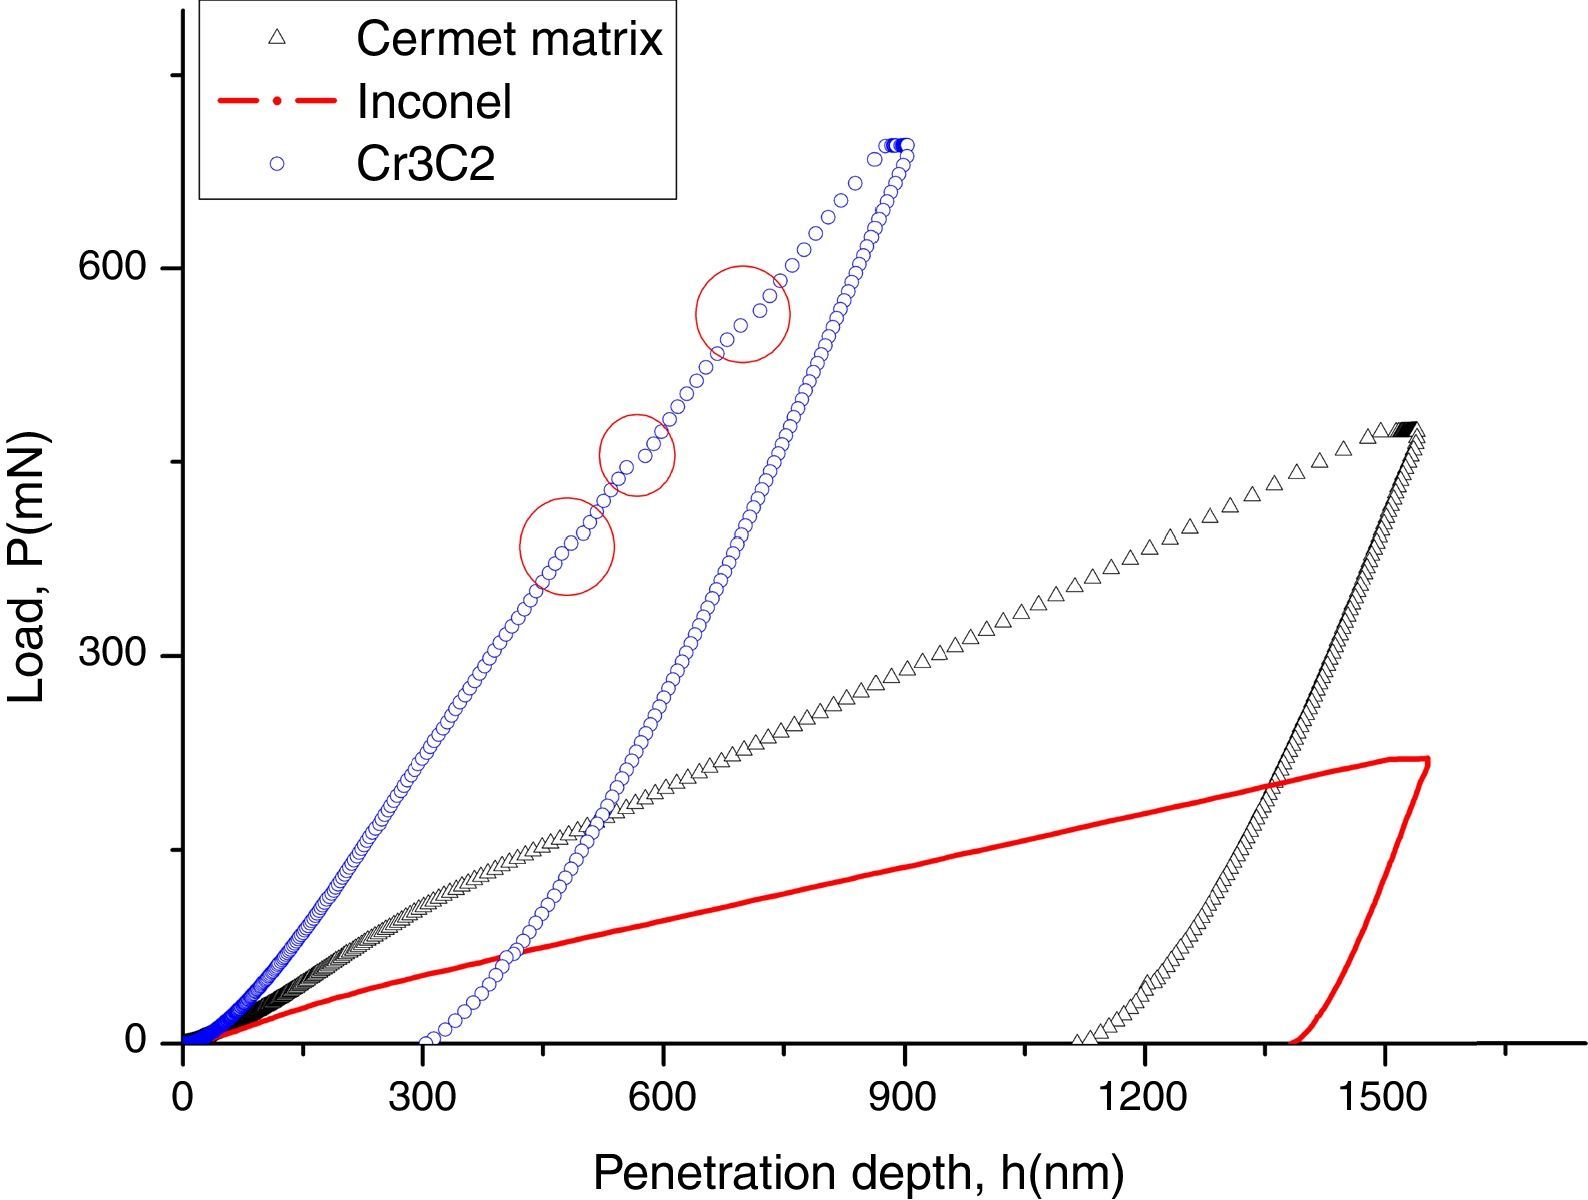
DSI tests with spherical indenter tipFig. 4 shows representative load vs. penetration depth curves obtained in DSI tests carried out using the spherical indenter tip. A higher indentation load is needed for the cermet matrix with respect to the Inconel 600 bulk to achieve the same penetration depth, in agreement with the results obtained using the Berkovich tip. It should be noted that there are multiple discontinuities in the curve of the unmelt Cr3C2 particle. This phenomenon is known as “pop-in” and it is associated to the formation of cracks in the material during the tests. Materials with hexagonal lattice structure, like the Cr3C2 ceramic particles used in this work, may present this behaviour. Others examples of materials showing this phenomena are the sapphire, the GaN, and the ZnO [25]. In the results shown in Fig. 4, the first “pop-in” happens at an indentation depth around 400nm, the second one at 550nm, and the third one around 700nm. There is no pop-in phenomena during the unloading process. For the analysis of the results only the data previous to the first pop-in event were used.
Indentation tests with a spherical tip represent the best choice to characterize the strain hardening which offers a gradual transition from elastic to elastic–plastic regime. The indentation stress vs. strain curve can be obtained using the model proposed by S.R. Kalidindi et al. [26]. The indentation stress (σind) and the indentation strain (¿ind) can be expressed respectively as:
where P is the applied load, a the contact radius, and h is the penetration depth.The value of Young's modulus of the studied materials was previously measured using the Oliver–Pharr method on the Berkovich indentation data, the contact radius a could be estimated according to the Sneddon's equation [27]:
where Su represent the harmonic contact stiffness obtained by the CSM methodology and Er is the reduced Young's modulus, that could be express as a function of the Young's modulus and Poisson's ratios of the studied material (E, ν) and the indenter tip (Ei, νi):The slope of the initial linear part of the indentation stress-strain curves, obtained for the cermet matrix and the Inconel 600 bulk, is approximately equal to the reduced Young's modulus obtained from the Oliver–Pharr analysis of the Berkovich indentation tests (in the zoom parts in Fig. 5). The plastic regime of the indentation stress–strain curves were fitted to a Hollomon equation [28]. The indentation stress–strain curve for cermet matrix shows a strain hardening value which is more than twice the one obtained for the Inconel 600 bulk. Probably, the M7C3 carbides, distributed around the unmelted Cr3C2 particles, could produce a distortional effect on the cermet matrix and consequently, they may produce a hardening effect. This result is in agreement to the one obtained from the Berkovich tests (Table 2).
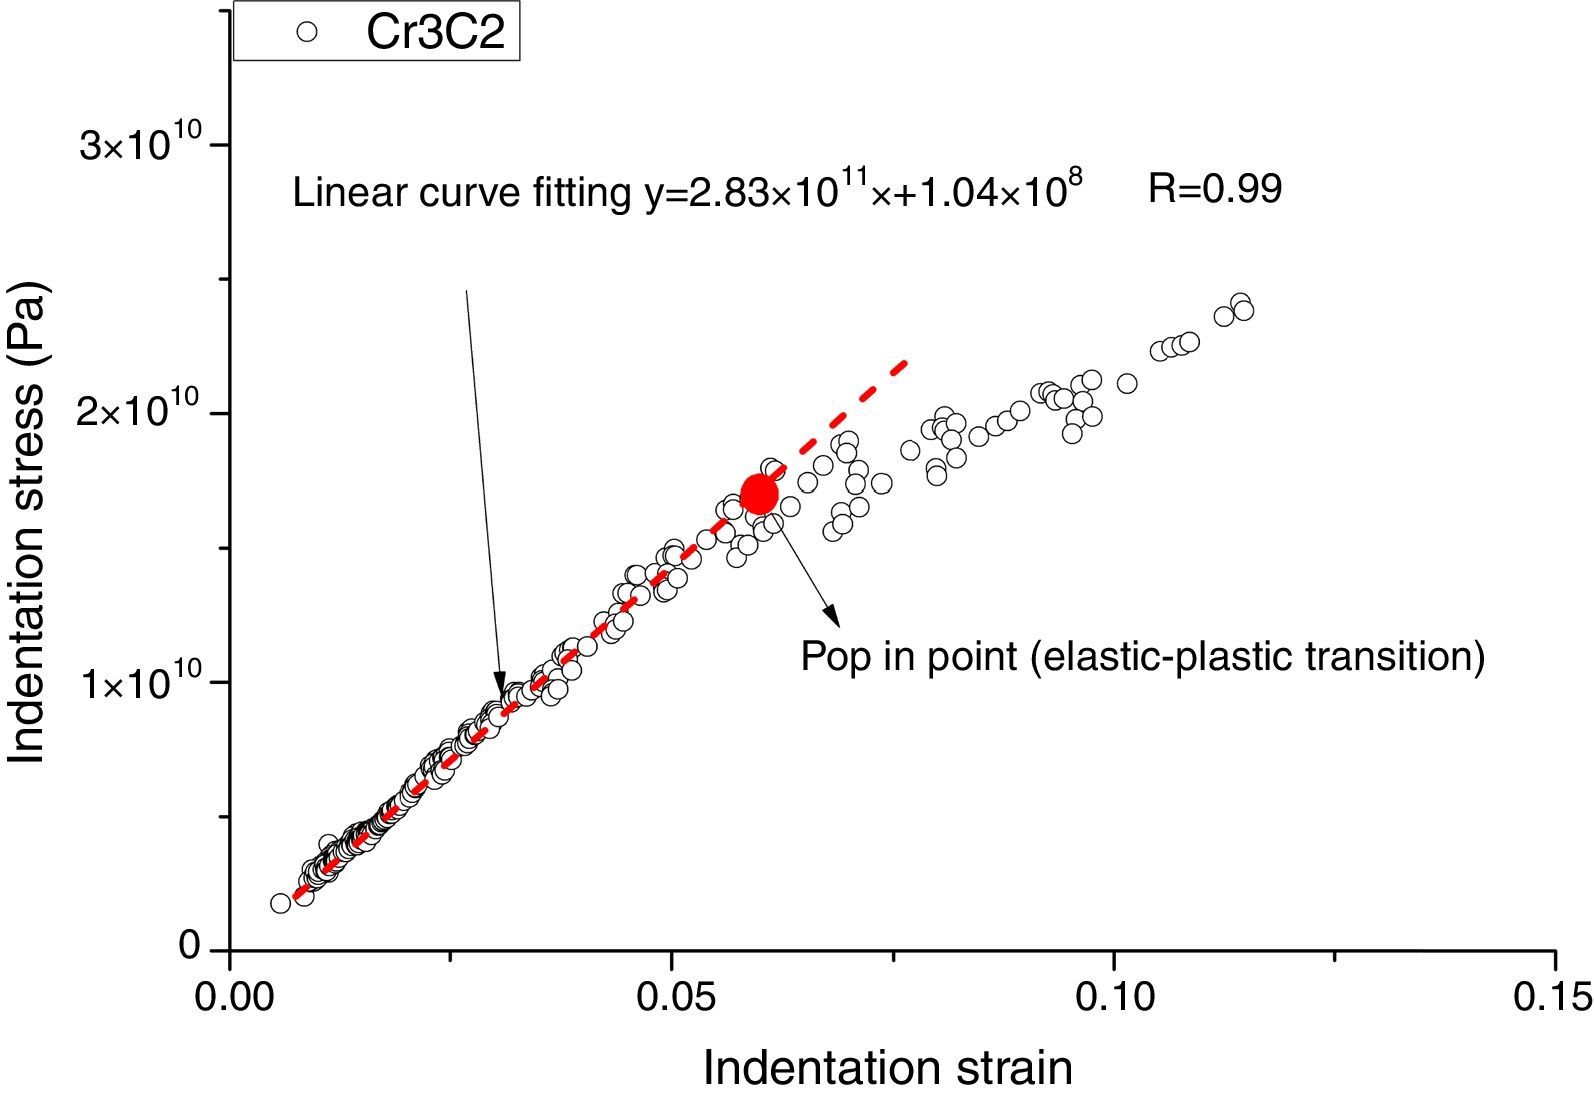
Fig. 6. shows the indentation stress–strain curve for unmelted Cr3C2 ceramic particles. The fitting was limited to those under the first “pop-in” event. The indentation stress–strain curve is linear with a slope that corresponds to the Young's modulus (364GPa) of the unmelted Cr3C2 particles. The critical point marked in red in the curve is the first “pop-in” point, at which initial cracking takes place. The mean pressure at this point is about 18GPa which is consistent with the values of hardness obtained from Vicker indentations in the literature [24,29].
ConclusionsIn this study, depth-sensing indentation tests were performed with Berkovich and spherical tips on Inconel 625-Cr3C2 cermet coatings in order to evaluate their elastic-plastic properties in the micro-scale. An Inconel 600 bulk specimen was used as reference sample for the calibration of the contact area equation.
The Nix and Gao model has been successfully employed to account for the indentation size effect (ISE) in the hardness measurements on the cermet matrix and the Inconel 600 bulk. The asymptotic hardness of the cermet matrix is equal to 3.85GPa, which is 60% higher than that of the Inconel 600 bulk (2.4GPa). The Young's modulus does not depend on the indentation depth and its value for the cermet matrix is 243GPa, whereas for the Inconel 600 bulk is equal to 211GPa. The indentation stress–strain curve in the plastic regime for the cermet matrix showed a strain hardening value which is more than twice the one obtained for the Inconel 600 bulk.
The unmelted Cr3C2 ceramic particles were also characterized by depth-sensing indentation tests with an spherical tip. In this case, the hardness values (around 23GPa) did not show any indentation size effect. The Young's modulus was equal to 373GPa, in agreement with published results. However, there were multiple “pop-in” events in the load–displacement curve associated to crack initiation in the material. The first “pop-in” event was observed at a penetration depth of about 400nm and the corresponding average pressure (18GPa) is similar to the hardness measured from Vicker indentations in the literature.
One of the authors, Chao Chang, appreciates the financial support provided by the Chinese Scholarship Council (CSC). This work was supported by the project BIA 2014-53314R.


