The main objective of the construction of a robot station presented in this article is to allow the students to design and produce a feasible-to-build mechatronic device using robust, low-cost components. It is a tool for students to gain experience integrating different mechatronic fields of knowledge, as well as practicing the procedures needed to successfully accomplish their own design. The project starts by describing the target requirements to be achieved by the prototype robot, these requirements will serve as the guideline for the design and further manufacture and testing of the system. The sub-assemblies of the mechanism are analyzed, main technical areas and their processes are discussed individually emphasizing the methods and materials used, then results are presented along with some practical recommendations to extend the scope of the project and improve the performance of the prototype robot. It has been especially important to maintain the didactical approach and design the platform with affordable components that can be easily obtained; this is also true for the tools and software used. The article is also intended to introduce the student to industrial design methodology, allowing for different manufacturing processes and robot architectures to be incorporated for the specific scope of the project and the available tools and facilities.
El objetivo principal de la estación robótica presentada en este artículo es servir como una plataforma Mecatrónica didáctica, robusta, relativamente económica y factible de construir, para que los estudiantes obtengan experiencia integrando diferentes áreas de la Mecatrónica y practiquen los distintos procedimientos requeridos para lograr exitosamente un diseño propio. El proyecto empieza con la especificación de los objetivos funcionales que la plataforma debe ser capaz de lograr, que a su vez servirán como una directriz para el diseño, posterior manufactura y prueba del sistema. Los sub ensambles principales del sistema son analizados, las áreas técnicas principales y sus procedimientos son discutidos individualmente haciendo hincapié en los métodos y materiales utilizados, luego los resultados son presentados en conjunto con algunas recomendaciones prácticas para extender el alcance del proyecto y mejorar el desempeño general del robot. Ha sido especialmente importante mantener el enfoque didáctico, así como diseñar la plataforma con componentes que pueden ser fácilmente obtenidos; se tuvo el mismo cuidado con las herramientas y los lenguajes de programación utilizados. El artículo está orientado a que el alumno se familiarice con la metodología de diseño utilizada en la industria, permitiendo la incorporación de diversos procesos de manufactura y arquitecturas de robots, así como adaptar el proyecto a los objetivos específicos del curso y a las herramientas e instalaciones disponibles.
For students to gain experience integrating different mechatronic fields of knowledge, the methodology presented in some papers can be used for mechanical design [1] [2], electronic design [3] [4], or power electronic for motion control [5] [6], or control algorithm implementation [7] [8]; unfortunately we didn’t found suitable projects, for a complete Mechatronic system that can be developed in a one semester course, for the last semesters undergrad or graduated students.
In order to design and manufacture a functional robotic system, a student should be capable of understanding, analyzing and synthesizing different concepts that deal with basic sciences, mechanics, electronics, control theory and programming, that is a long way to go for any undergrad or graduated student. If one is meant to implement a self-built working design the first option is to take several months or even years of study to acquire all this knowledge. A second option would be to buy a market available robotic kit, usually being the main disadvantages of this option the limited possibilities for experimenting with robotic architectures and the high price one has to pay for the materials’ supply chain plus the intellectual property, marketing and engineering hours of the company that puts the pieces together.
A third option is to be presented here, however this is not effortless at all. The student should have to get all the needed materials and apply some knowledge as well, but at the end it will be cheaper and more flexible than buying a robotic kit and easier than designing everything from scratch, so it can be considered as an intermediate alternative to make a working self-built mechatronic system.
The remaining sections of this paper present the development of a robot station according to the following methodology:
- -
Project objectives are stated by specifying the target requirement to be achieved by the manipulator. These objectives are defined following the Project Management Institute (PMI) recommendations, and should be considered for all the design and manufacturing processes, taking them into account for consideration if any change is made and verified during final acceptant test phase.
- -
A set of selected materials are presented and additional materials such as screws and round head pins may be incorporated by the students.
- -
Functionality for each subsystem is revised and some implementation techniques are discussed. For an industrial approach it is required that the prototype can be disassembled to allow joints (bearing and motors) to be serviced or repaired when it is needed.
- -
The students select a CAD software to be used for the mechanical design; by using it the dimensions of the different links are defined and modified in order to meet the prototype specifications. The mechanical design starts with the arms of the robot, focusing on the dimensions of its links. Once the arms are designed the base should be planned to provide stability and support.
- -
After pieces are designed and verified in the 3D environment, 2D engineering descriptive drawings are created. The pieces can be hand cut or machined depending on the selected production-processes and available facilities.
- -
Several assembly processes are used to put the pieces together, including creating holes where screws are required and attaching some components by pressure or epoxy gluing.
- -
The electrical design is performed to specify the power supply, PCB and required wiring, and then the electrical system is implemented.
- -
.The control board (Arduino platform) is programed to control the prototype robot, and the programing can be further developed for more challenging applications in accordance to the specific objectives of the course.
- -
The final acceptant tests of the robot station are accomplished to verify its performance.
As an example of some target requirements to be achieved by the manipulator, it should be able to:
- -
Reach any object at least 40 cm from the servomotor axis.
- -
Achieve a precision of ±0.5 cm for repetitive movements.
- -
Be able to lift at least 10% of its own weight, not considering power supplies.
- -
Maximum time of 3 seconds to get from any position A(x,y,z) to any position B(x,y,z).
- -
Variable speed control for the movements.
- -
3DOF plus a 1 DOF gripper to lift the specified weight.
- -
Manipulator should be designed to allow for servomotors and bearings to be disassembled for service or replacement.
These requirements are considered in all the design and manufacture process, taking them into account for negotiation if any change is to be made and verified during final acceptant test phase.
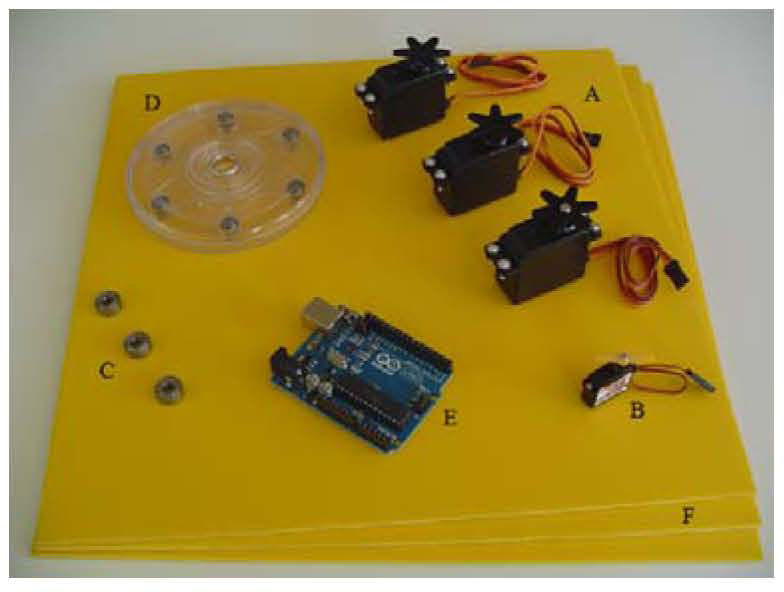
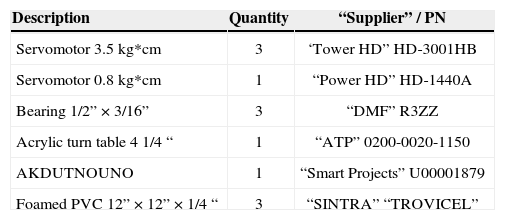
2.2MaterialsThe main selected materials for the proposed platform are listed in Table 1 and shown in Figure 1:
List of materials for the robotic station.
| Description | Quantity | “Supplier” / PN |
|---|---|---|
| Servomotor 3.5 kg*cm | 3 | ‘Tower HD” HD-3001HB |
| Servomotor 0.8 kg*cm | 1 | “Power HD” HD-1440A |
| Bearing 1/2” × 3/16” | 3 | “DMF” R3ZZ |
| Acrylic turn table 4 1/4 “ | 1 | “ATP” 0200-0020-1150 |
| AKDUTNOUNO | 1 | “Smart Projects” U00001879 |
| Foamed PVC 12” × 12” × 1/4 “ | 3 | “SINTRA” “TROVICEL” |
The robot is integrated by the following main sub-assemblies shown in Figure 2; dimensions are only shown as an example and they should be determined by the student during the mechanical design phase:
BaseThe function of the base is to give support and stability to the robot station; it also holds the servo motor to spin the robot in the Z axis. It should be designed to maximize the contact area with the floor and minimizing its weight.
Rotating Bearing tableThe rotating bearing table is intended to allow the free rotation of the main body of the robot by minimizing the friction and supporting the weight of the motor base, motors, links and gripper, resembling the rotating mechanisms in industrial robots.
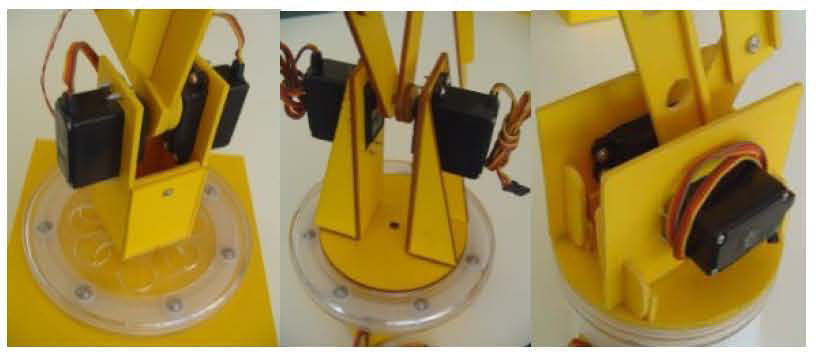
Motors baseThis subassembly is very important and will usually take the longest time to design and improve. The motors are supported here, requiring design and manufacture precision for the alignment of the motor shafts and the distance between the motors. It is attached to the rotating bearing table.
Robot arm (links)The links should be designed in order to accomplish the proposed range; their width is also an important characteristic to be considered. As a rule of thumb, links must conserve proportionality to increase the stability and performance of the robot.
GripperIt is the essential part to assure a good grabbing of the pieces to be manipulated by the robot. In the design a micro servo motor is proposed, which weighs less than 5 grams and has a relatively good torque of 0.8kg-cm. To select this servo motor there has to be a tradeoff between these two characteristics. It is also recommended to cover the gripper contact area with a high friction material such as foamy to increase the grabbing force.
3Mechanical design3.1Design software and methodologyThe main recommended tool to be used for the mechanical design is CAD software; by using it the dimensions of the different links can be easily tested and modified in order to meet the prototype specifications.
It is essential to have an iterative process between the 2D engineering drawings and the 3D model used to simulate the mechanic limits, advantages and disadvantages of the proposed prototype.
It is recommended to start the mechanical design with the arm of the robot, focusing on the dimensions of its links. Once the arm is designed the base should be planned to provide stability and support. There are some critical assemblies that must be taken care of during the design:
- •
The axis of the 2 arm servomotors that will power the parallel links must be properly centered.
- •
The bearings, couplings and joints of the arm and their relative tolerance.
- •
The attrition of the parts or joints during movements.
- •
Weight vs. stiffness in the arm links.
- •
Stability vs. weight in the base.
- •
Gripper design based on the desired application.
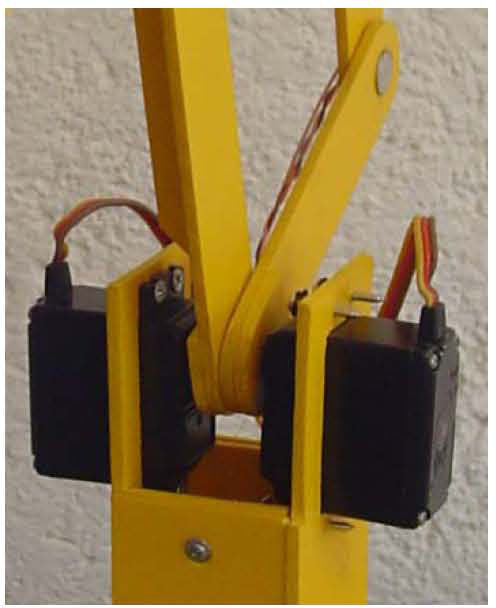
One of the most critical sections is the arm servomotors’ position and adjustment, as shown in Figure 3 the space between these two motors must be minimized and the axis must be centered in order to achieve a soft and precise movement of the arm. This will also help to reduce vibration while moving the arm or lifting weight.
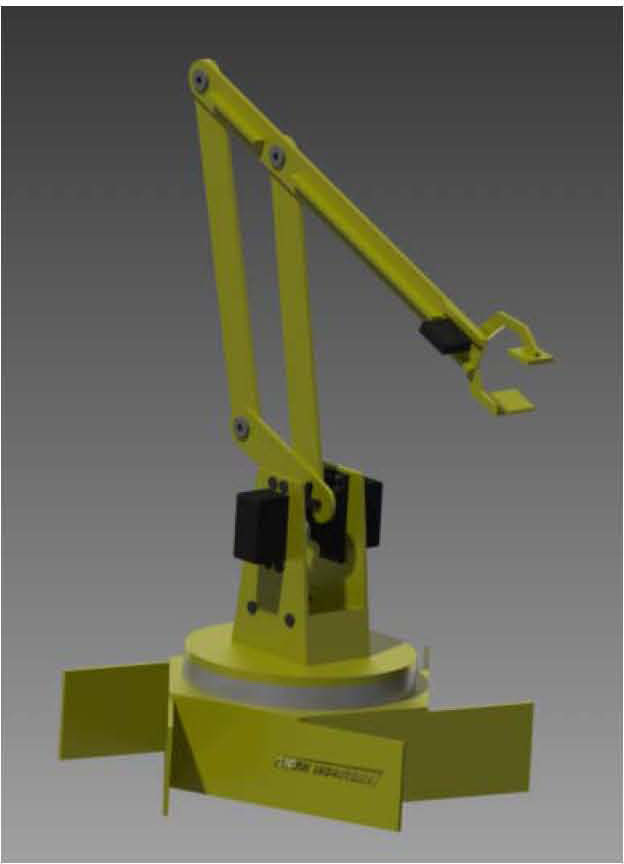
It is suggested to design a base to add stability to the arm while keeping its own weight at minimum; a design example is presented in the Figure 4, as shown the lateral faces of the polygon have been prolonged to give the base more supporting area while reducing its volume.
It is essential that the prototype can be disassembled or repaired in case it is needed; mechanical design plays an important factor in this matter to resemble industrial criteria. A “plug – socket” configuration is one possibility for the union of different mechanic parts in the prototype, such as the motor base with the rotating bearing table or the lateral sections of the base with the top section, this will give an easy and precise assembly while allowing other parts to be disassembled and assembled any time it is needed.
3.2Manufacturing processOnce the pieces were designed and tested in the 3D environment, 2D engineering descriptive drawings are created. The pieces can be hand cut, or machined depending on the facilities available and production processes selected, as an example here a laser cutting machine was used, so the procedure is therefore described. After the pieces are completed in AutoCAD it is necessary to change its format to a .dxf and save them in AutoCAD 2004 version, this format is later used by another software called RHINOCEROS; this program is used to define the final specifications to the laser cutting machine such as the size of the material to be cut, the colors of some lines to define the sequence of cutting area in the material and finally the coordinate origin in the material.
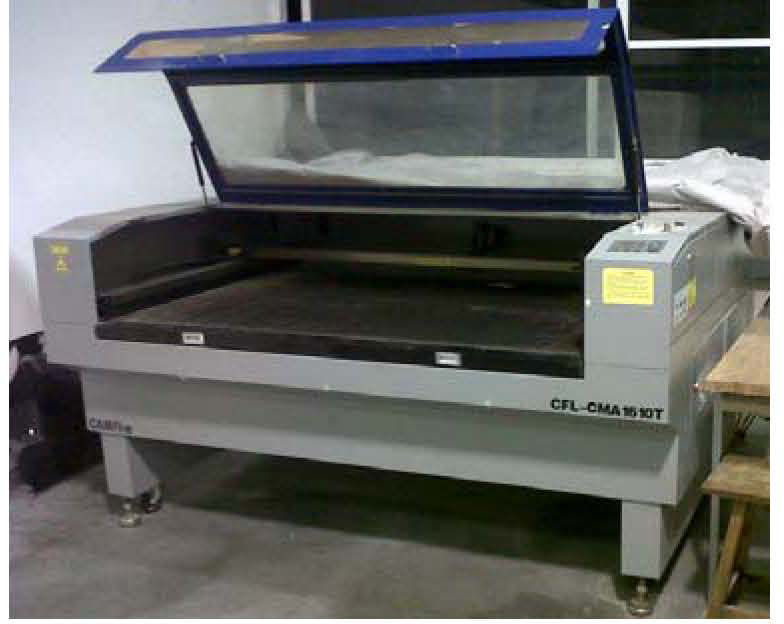
The cutting machine shown in Figure 5 has a positioning tolerance better than +/− 0.1mm, this let us create geometries with high precision and detail, CAD modeling allows to make the necessary changes to the geometry, thus obtaining a refined model.
All the parts were manufactured by this laser cutting machine and the material used was foamed PVC, which is a light material (0.3 gr/cm2) and also rigid enough to meet the design specifications.
To manufacture the L shaped pieces, the sheets were hot bended by placing them half-minute into the bending machine, then these had to be molded according to the required geometry.
3.3Assembly procedureSeveral assembly processes can be used to put the pieces together like making holes to fix pieces were screws are required for the support components, as an example some motor base-rotating bearing tables are shown in Figure 6.
To assemble the base, its components are attached by epoxy glue that allows having a good rigidity. In general, manufacturing processes are not very complex, this is accomplished if most of the efforts are focused in the design phase on doing a sound CAD design and prototyping work; the purpose is avoiding future problems in the assembly of the robot, thus saving time and money.
4Electronic design4.1Power supplyThe utilized power supply was a D.C. 7.5 volts 2 Amp voltage source. The designed PCB includes a 5 Volts regulator to keep the power to the required level, providing a rectified signal that is essential to guarantee the correct operation of the motors and avoid unwanted misbehaviors.
The control circuit is fed by an independent source; in this case the digital voltage is obtained directly from the master control computer. It is basic to have a reliable power supply in order to guarantee the correct operation of the circuits.
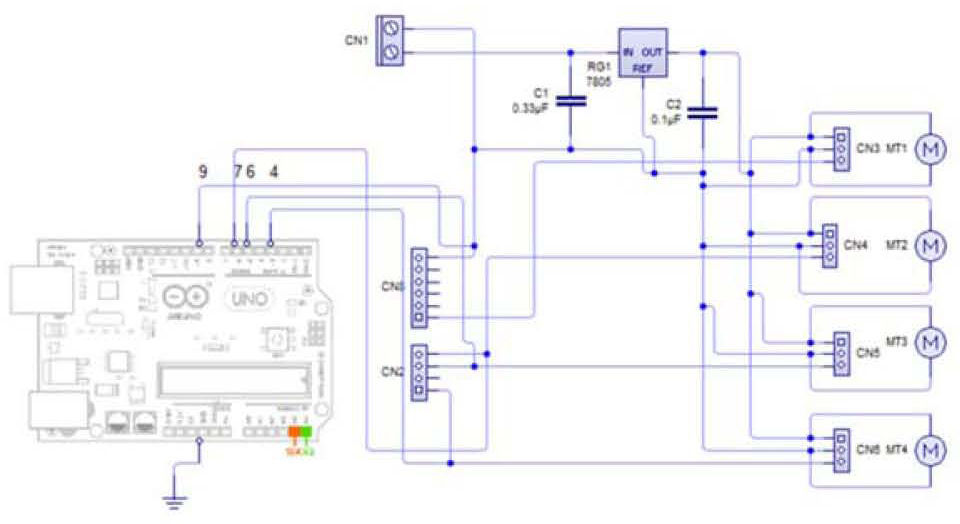
4.2Printed Circuit BoardThe designed printed circuit board is necessary to hold the power supply lines; it also provides mechanical support for all the other electronic components: the control circuit, capacitors and the pin connectors for every motor. The PCB design was made in Livewire, this is specialized but light software for the development of printed circuit boards, and it contains the necessary libraries to use all the components for the designed circuit. The first step is to create a schematic circuit of the components with connections; the electric circuit is shown in the Figure 7.
The schematic circuit is later imported to another program called PCB Wizard, where circuit tracks were created.
Additionally the program creates other schematics that show the final distribution of some components as shown in Figure 8.
4.3WiringThe wiring is used to transport the power from the source to the motors, which are in the motor base and the gripper of the robot. Wiring should be rigid enough to accompany the movement of joints and avoid interference to the movement of the links. Wire-wrap was used for the wiring; this is a 30 AWG cable. Wires were attached using epoxy glue, which provides a good support to the cables and reduction for vibrations.
The motors’ female pin connectors and the Arduino are fixed to the PCB with header pin connectors that are welded to the PCB.
The cable attachment allows free movement of the joints of the robot, the location of these cables is important to avoid some failure caused by the movement of the robot. All the movement routines were tested successfully, with no interference of the cables.
5Programming5.1ArchitectureTwo programs were developed to control the system, an Arduino code and a Central Control code. The Arduino code, is intended to generate the basic signals to control the servomotors position, while Central Control code could perform more complex task that involves heavy processing in case of requiring a difficult to compute trajectory that might consume considerable processor resources. Any microcontroller might be used for the position control; the microcontroller program receives the position of the different motors through commands from the Central Control program. This Central Control program also works as a User Interface (UI). This kind of distributed processing was tested for the following reasons:
- -
To increase modularity of the software architecture.
- -
Reduce microcontroller processing requirements
- -
Allow for better User Interface possibilities.
- -
:If any microcontroller (besides Arduino) is selected, it avoids the repetitive use of specialized hardware (programmers) in case reprogramming of the robot behavior is needed given that microcontroller is just programmed once. Microcontroller plus robot can be seen as one big block, having to deal with the programming just in the host PC, thus decreasing development time.
- -
Possibility of further application development: allowing easier peripheral implementation such as with video cameras or voice recognition that require more powerful processing, and that also have protocols and libraries totally documented for traditional operative systems.
The communication between the robot “brain” and the servomotor controller was implemented on the well-known RS-232 protocol. An open source library called LnxCOMM, which is authorized under GNU license by Fernando Pujaico, compiled and executed on Windows. The serial communication is configured to 115 kbps, 8 bits, one stop bit, and no flow control.
The command is sent with the following structure: P,PM01,PM02,PM03,PM04,
As an example, this is a position command for the servomotors: P,0750,1230,0100,0050,
The motor positions are send on an [0,1500] interval, position that is read and interpreted by the motor controller positioning the robot as the master control orders.
The maximum refresh frequency of the motors is 25Hz because of the limitations of the control system that standard servomotors have implemented inside. Every character send is a representation in ASCII code.
5.3Code ImplementationThe code for the control master was developed in C to increase the portability; the only additional library besides the standard ones is the already mentioned LnxCOMM.
The Arduino code for the motor controller has only one function, to modulate the PWM signal to change its duty cycle, thus moving the servo motors to the desired angle.
The positions are commanded by a central control, sent via RS-232. This function is achieved by using a timer in the microcontroller.
In the central controller several functions and routines were implemented, the main are described below:
Send command function: It will read the motors’ positions from an array or a pointer and will convert them into ASCII to send the command, by using LnxCOMM library it sends the complete command in the specified format (using delimiters between each motor position) via RS-232. If the microcontroller is programmed to send any message back to confirm the data reception, the data should be read from the port buffer, otherwise an overflow and execution time error might occur. This routine is the base to build other functions, such as:
- 1.-
Go home: Send fix coordinates to the robot; it goes to a basic known position that is usually called “home
- 2.-
Joint coordinate motion: By pressing keys, such as ‘Q’ and ‘W’, the user is able to move each joint of the robot an assigned step size. It is easily accomplished by changing the motors’ position in the array or pointer assigned.
- 3.-
Send servos position: It allows the user to send a value to each joint of the motor, it is especially useful if a previous sequence’s point wants to be proved in a new sequence.
- 4.-
Set speed: Changes the step size of joint coordinate motor, and the speed of execution of a sequence.
- 5.-
Save points: It is based on joint coordinate motion function. By moving the motors to the desired position, the robot interacts with its environment, and then a sequence of points is saved to be played later. It works very similarly to an industrial robot teach pendant.
- 6.-
Play sequence: It plays the saved points sequence from command 5 at a given speed in command 4.
- 7.-
Play sample sequence: A fixed routine can be directly written to the main program as a macro. It is especially useful if you need to demonstrate your robot’s skills in a predetermined way.
- 8.-
Print points: Useful for debugging purposes
This section is very important for an accurate positioning of the robot. On the datasheets of standard servomotors, the digital PWM controls are specified. Its maximum frequency is 25 Hz, and the duty cycle is modulated linearly according to the set point position. Just to say an example a duty cycle of 0% will take the motor to an angular position of 0° and a duty cycle of 100% will take the motor to a 180°. This is the theory, however, because of the diversity of methods and manufacturers, the variability of the real results of the control have a significant variance, for example to get the limit positions or refresh frequencies. This implies that for a better precision real life testing should be done, registering the real positions according to the PWM control signal as accurately as possible to test the real range, its effective resolution, and its maximum and minimum refresh frequency. This procedure was followed to ensure the real life accuracy of the motors once they are mounted on the robot.
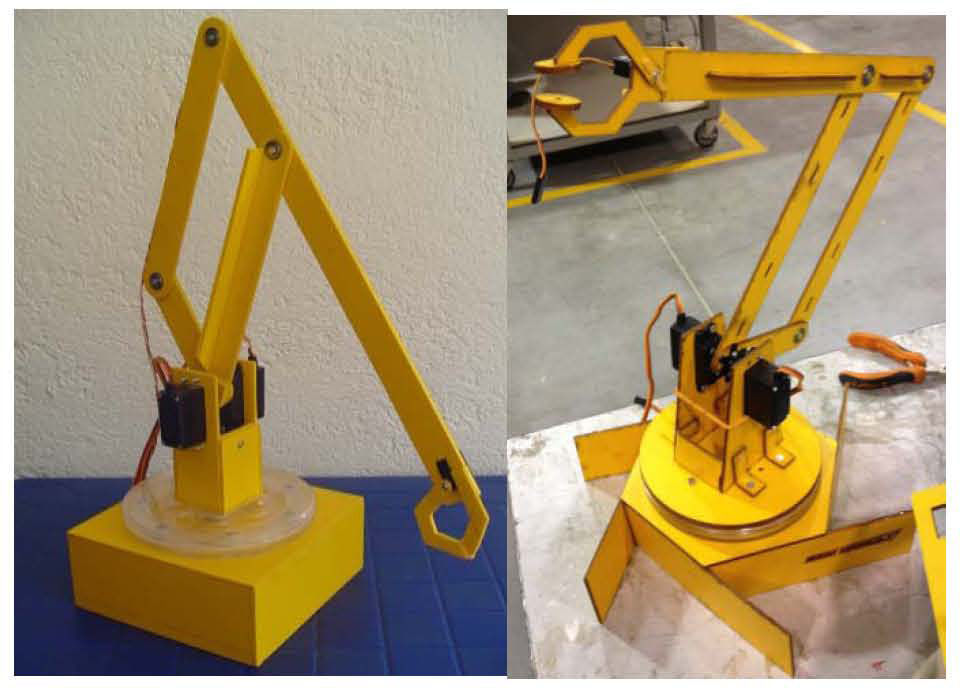
6ResultsThe proposed didactic mechatronic platform has been tested for last semester undergrad Mechatronic courses, allowing for completing the project during one semester period of time and providing enough flexibility to test different robot architectures and manufacturing processes. As an example, two robot prototypes are shown in Figure 9.
7ConclusionsThe proposed didactic platform and methodology can be used to introduce the student to the industrial design procedures, allowing for different manufacturing processes and robot architectures to be incorporated for the specific scope of the course and the available tools and facilities. It is possible to incorporate topics such as kinematics and dynamics and further application development for easier peripheral implementation such as with video cameras or voice recognition.
Two programs were developed to control the system, an Arduino code and a Central Control.


